

Gazebo Simulation with ROS 2: Spawn and Drive a Robot in gz sim
Simulate a robot in Gazebo Harmonic with ROS 2 Jazzy: gz sim, DiffDrive and lidar plugins, ros_gz_bridge topics, spawning from URDF and use_sim_time.
Driving schools in Indore do not put a first-day learner on the Bhawarkua square at 6 pm. They start on an empty ground, or on a simulator where a mistake costs nothing. The steering, the pedals and the mirrors work like the real car, so the habits carry over.
A robot needs the same thing. A wrong sign in your controller can drive a real robot off a table in half a second. In a simulator, you reset the world and try again.
The simulator only helps if it behaves enough like reality. That is Gazebo's job: physics, sensors and worlds realistic enough that your ROS 2 nodes cannot tell the difference.
What is Gazebo?
Map the driving school onto robotics. The simulator car is your robot model, built from the URDF in describing a robot with URDF. The practice ground with cones is a Gazebo world.
The pedals and mirrors wired into the simulator are plugins (Gazebo calls them systems) that turn commands into wheel motion and render sensor data. And the learner is your unchanged ROS 2 code.
Gazebo is an open-source robotics simulator that runs rigid-body physics, simulated sensors such as lidar, cameras and IMUs, and 3D worlds, and exchanges data with ROS 2 through the ros_gz bridge packages.
Gazebo names and versions in 2026
The naming history confuses almost everyone, so here it is in one place.
- Gazebo Classic (versions up to 11, command
gazebo) is the original simulator. It reached end of life in January 2025. Old tutorials usinggazebo_rosandlibgazebo_ros_diff_drive.soare for this version. - Ignition Gazebo was the rewrite. In 2022 it was renamed simply Gazebo, with letter-named releases and the command
gz sim. - Plugin file names changed with the rename, from
ignition-gazebo-...togz-sim-....
| ROS 2 distro | Recommended Gazebo | Install with |
|---|---|---|
| Humble (LTS) | Fortress (LTS) | ros-humble-ros-gz |
| Jazzy (LTS) | Harmonic (LTS) | ros-jazzy-ros-gz |
| Kilted | Ionic | ros-kilted-ros-gz |
| Lyrical (LTS) | Jetty (LTS) | ros-lyrical-ros-gz |
This lesson targets ROS 2 Jazzy with Gazebo Harmonic on Ubuntu 24.04; the syntax is the same on Lyrical with Jetty. Gazebo's documentation recommends the version that comes with ros_gz from the ROS repository.
Quick check
Which command starts the current Gazebo simulator with a world file?
Modern Gazebo (Harmonic, Jetty) runs as gz sim. The gazebo command and gazebo_ros belong to Gazebo Classic, which reached end of life in January 2025.
How does Gazebo connect to ROS 2?
Gazebo has its own messaging system, Gazebo Transport, with its own topic names and message types. It does not speak ROS 2 directly. The ros_gz packages are the translator.
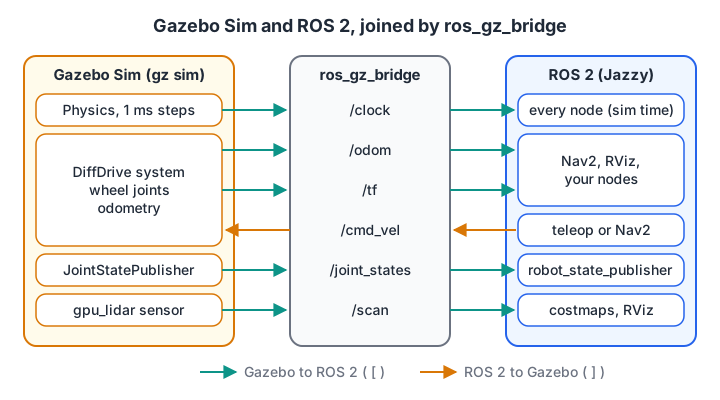
Every arrow across the middle is one bridged topic. Anything you do not bridge stays invisible to ROS 2.
- ros_gz_sim starts Gazebo from a ROS 2 launch file and provides
create, which spawns a robot from its URDF. - ros_gz_bridge runs
parameter_bridge, which copies messages between a Gazebo topic and a ROS 2 topic. - ros_gz_image bridges camera images more efficiently than the generic bridge.
Reading the bridge syntax
On the command line, each bridged topic is written as TOPIC@ROS_TYPE@GZ_TYPE. The symbol between the two types sets the direction.
| Separator | Direction | Typical topic |
|---|---|---|
@ |
Both ways | Rarely needed |
[ |
Gazebo to ROS 2 | /scan, /odom, /clock |
] |
ROS 2 to Gazebo | /cmd_vel |
This small parser shows how a bridge argument breaks down, which is handy when a long launch file argument will not work.
def parse_bridge(arg):
    topic, rest = arg.split("@", 1)
    for sep, direction in (("[", "Gazebo -> ROS 2"), ("]", "ROS 2 -> Gazebo"), ("@", "both ways")):
        if sep in rest:
            ros_type, gz_type = rest.split(sep, 1)
            return topic, ros_type, gz_type, direction
    raise ValueError(f"no direction symbol in {arg!r}")

args = [
    "/clock@rosgraph_msgs/msg/Clock[gz.msgs.Clock",
    "/cmd_vel@geometry_msgs/msg/Twist]gz.msgs.Twist",
    "/scan@sensor_msgs/msg/LaserScan[gz.msgs.LaserScan",
    "/odom@nav_msgs/msg/Odometry[gz.msgs.Odometry",
    "/keyboard/keypress@std_msgs/msg/Int32@gz.msgs.Int32",
]
for a in args:
    topic, ros_t, gz_t, d = parse_bridge(a)
    print(f"{topic:20} {d:16} ROS {ros_t:28} <-> Gazebo {gz_t}")
Quick check
In the bridge argument /cmd_vel@geometry_msgs/msg/Twist]gz.msgs.Twist, what does ] mean?
] sends messages from ROS 2 into Gazebo, which is what a velocity command needs. [ is the opposite direction and @ is bidirectional.
Install Gazebo Harmonic and run a first world
One package installs Gazebo Harmonic and the ROS integration for Jazzy.
sudo apt install ros-jazzy-ros-gz ros-jazzy-teleop-twist-keyboard
source /opt/ros/jazzy/setup.bash

gz sim shapes.sdf            # a demo world; press the play button to start physics
gz topic -l                  # in another terminal: list Gazebo Transport topics

# Or start Gazebo through ROS 2
ros2 launch ros_gz_sim gz_sim.launch.py gz_args:=empty.sdf
A very slow window usually means a virtual machine or missing GPU drivers. Physics still runs, but gpu_lidar and cameras need OpenGL.
Make your URDF simulation-ready
Gazebo has to move the robot, so it needs what URDF lacks: which plugin turns /cmd_vel into wheel motion, which link holds the lidar, and how slippery the caster is. You add this in <gazebo> tags, which Gazebo reads when it converts the URDF to SDF.
Keep these tags in a separate file, urdf/my_robot.gazebo.xacro, and include it from the main model with <xacro:include filename="my_robot.gazebo.xacro"/>. Joint and link names must match the URDF exactly.
<?xml version="1.0"?>
<robot xmlns:xacro="http://www.ros.org/wiki/xacro">
  <!-- Drive the two wheel joints from cmd_vel and publish odometry + odom->base_footprint TF -->
  <gazebo>
    <plugin filename="gz-sim-diff-drive-system" name="gz::sim::systems::DiffDrive">
      <left_joint>left_wheel_joint</left_joint>
      <right_joint>right_wheel_joint</right_joint>
      <wheel_separation>0.18</wheel_separation>
      <wheel_radius>0.033</wheel_radius>
      <max_linear_acceleration>1.0</max_linear_acceleration>
      <topic>cmd_vel</topic>
      <odom_topic>odom</odom_topic>
      <tf_topic>tf</tf_topic>
      <frame_id>odom</frame_id>
      <child_frame_id>base_footprint</child_frame_id>
      <odom_publish_frequency>30</odom_publish_frequency>
    </plugin>
    <!-- Publish wheel angles so robot_state_publisher can place the wheel links -->
    <plugin filename="gz-sim-joint-state-publisher-system" name="gz::sim::systems::JointStatePublisher">
      <topic>joint_states</topic>
    </plugin>
  </gazebo>

  <!-- A frictionless caster so it slides instead of dragging -->
  <gazebo reference="caster">
    <mu1>0.0</mu1>
    <mu2>0.0</mu2>
  </gazebo>

  <!-- A 360-degree 2D lidar on lidar_link -->
  <gazebo reference="lidar_link">
    <sensor name="lidar" type="gpu_lidar">
      <topic>scan</topic>
      <gz_frame_id>lidar_link</gz_frame_id>
      <update_rate>10</update_rate>
      <always_on>true</always_on>
      <visualize>true</visualize>
      <lidar>
        <scan>
          <horizontal>
            <samples>360</samples>
            <min_angle>-3.14159</min_angle>
            <max_angle>3.14159</max_angle>
          </horizontal>
        </scan>
        <range>
          <min>0.12</min>
          <max>8.0</max>
          <resolution>0.01</resolution>
        </range>
      </lidar>
    </sensor>
  </gazebo>
</robot>
wheel_separation and wheel_radius must match the URDF, or odometry will disagree with the motion, just like a mismeasured track width on a real differential drive robot. gz_frame_id matters because conversion merges fixed joints into their parent link; without it, scans arrive with a frame name missing from your TF tree.
A world with the sensors system
Sensors only produce data if the world loads the Sensors system. A world file that lists its own plugins replaces Gazebo's defaults, so include the physics and scene systems as well. Save this as worlds/room.sdf:
<?xml version="1.0"?>
<sdf version="1.9">
  <world name="room">
    <physics name="1ms" type="ignored">
      <max_step_size>0.001</max_step_size>
      <real_time_factor>1.0</real_time_factor>
    </physics>
    <plugin filename="gz-sim-physics-system" name="gz::sim::systems::Physics"/>
    <plugin filename="gz-sim-user-commands-system" name="gz::sim::systems::UserCommands"/>
    <plugin filename="gz-sim-scene-broadcaster-system" name="gz::sim::systems::SceneBroadcaster"/>
    <plugin filename="gz-sim-sensors-system" name="gz::sim::systems::Sensors">
      <render_engine>ogre2</render_engine>
    </plugin>
    <include><uri>https://fuel.gazebosim.org/1.0/OpenRobotics/models/Ground Plane</uri></include>
    <include><uri>https://fuel.gazebosim.org/1.0/OpenRobotics/models/Sun</uri></include>
    <model name="box_obstacle">
      <static>true</static>
      <pose>1.5 0.5 0.25 0 0 0</pose>
      <link name="link">
        <collision name="c"><geometry><box><size>0.5 0.5 0.5</size></box></geometry></collision>
        <visual name="v"><geometry><box><size>0.5 0.5 0.5</size></box></geometry></visual>
      </link>
    </model>
  </world>
</sdf>
The two include lines download the ground plane and sun models from Gazebo Fuel the first time, then use the local cache.
What does one simulation step do?
Gazebo advances the world in fixed steps of simulated time, here 1 millisecond. Each step, the systems run in order: apply commands, step the physics, update sensors that are due, and publish.
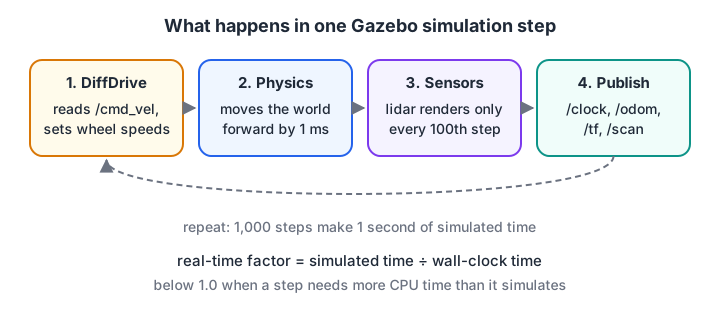
Sensors run slower than physics. A 10 Hz lidar produces one scan every 100 physics steps of 1 ms.
The real-time factor compares simulated time with wall-clock time. A value of 1.0 means one simulated second per real second; a busy laptop might only manage 0.6. Because of this, ROS 2 nodes in simulation must read time from the /clock topic, which is what use_sim_time:=true does.
Step size also changes what physics can catch. Contacts are checked at the end of each step, so a fast object can jump over a thin obstacle. This block drives a robot at 2 m/s at a 4 cm wall with three step sizes, then computes the real-time factor for two CPU loads.
WALL = (1.00, 1.04)                         # a 4 cm thick wall, metres along x

def drive_at_wall(dt, speed=2.0, x=0.05, sim_seconds=1.0):
    for step in range(round(sim_seconds / dt)):
        x += speed * dt                     # one physics step
        if WALL[0] <= x <= WALL[1]:         # contact check happens only at step ends
            return f"hit the wall at x={x:.3f} m after {step + 1} steps"
    return f"passed THROUGH the wall, ended at x={x:.2f} m"

for dt in (0.001, 0.01, 0.05):
    print(f"step {dt * 1000:4.0f} ms: {drive_at_wall(dt)}")

for cost_ms in (0.6, 1.6):                  # CPU time needed per 1 ms physics step
    rtf = min(1.0, 1 / cost_ms)             # the world file caps it at 1.0
    print(f"{cost_ms} ms of CPU per 1 ms step -> real-time factor {rtf:.2f}, "
          f"10 s of simulation takes {10 / rtf:.1f} s")
With 1 ms and 10 ms steps the robot hits the wall; with 50 ms steps it moves 10 cm per step and tunnels through. Gazebo's solver is far more careful, but the trade-off is real: smaller steps cost more CPU, and when a step needs more CPU time than it simulates, the real-time factor drops below 1.0.
Quick check
Why should ROS 2 nodes use use_sim_time when running with Gazebo?
When the real-time factor is not 1.0, wall-clock timestamps disagree with simulated data. Reading /clock keeps TF, sensors and controllers consistent.
Spawn and drive the robot from a launch file
This Python launch file in my_robot_description/launch/sim.launch.py does five things: start Gazebo with the world, publish the robot description, spawn the robot from that description, start the bridge, and keep every node on simulation time.
import os
from ament_index_python.packages import get_package_share_directory
from launch import LaunchDescription
from launch.actions import IncludeLaunchDescription
from launch.launch_description_sources import PythonLaunchDescriptionSource
from launch.substitutions import Command
from launch_ros.actions import Node
from launch_ros.parameter_descriptions import ParameterValue


def generate_launch_description():
    pkg = get_package_share_directory('my_robot_description')
    gz_launch = os.path.join(get_package_share_directory('ros_gz_sim'), 'launch', 'gz_sim.launch.py')
    world = os.path.join(pkg, 'worlds', 'room.sdf')
    xacro_file = os.path.join(pkg, 'urdf', 'my_robot.urdf.xacro')
    bridge_config = os.path.join(pkg, 'config', 'bridge.yaml')
    robot_description = ParameterValue(Command(['xacro ', xacro_file]), value_type=str)

    return LaunchDescription([
        IncludeLaunchDescription(
            PythonLaunchDescriptionSource(gz_launch),
            launch_arguments={'gz_args': f'-r {world}', 'on_exit_shutdown': 'true'}.items()),
        Node(package='robot_state_publisher', executable='robot_state_publisher',
             parameters=[{'robot_description': robot_description, 'use_sim_time': True}]),
        Node(package='ros_gz_sim', executable='create',
             arguments=['-topic', 'robot_description', '-name', 'my_robot', '-z', '0.02']),
        Node(package='ros_gz_bridge', executable='parameter_bridge',
             parameters=[{'config_file': bridge_config, 'use_sim_time': True}]),
    ])
The -r in gz_args starts the simulation running instead of paused. The bridge reads its topic list from config/bridge.yaml:
- ros_topic_name: "clock"
  gz_topic_name: "/clock"
  ros_type_name: "rosgraph_msgs/msg/Clock"
  gz_type_name: "gz.msgs.Clock"
  direction: GZ_TO_ROS
- ros_topic_name: "cmd_vel"
  gz_topic_name: "/cmd_vel"
  ros_type_name: "geometry_msgs/msg/Twist"
  gz_type_name: "gz.msgs.Twist"
  direction: ROS_TO_GZ
- ros_topic_name: "odom"
  gz_topic_name: "/odom"
  ros_type_name: "nav_msgs/msg/Odometry"
  gz_type_name: "gz.msgs.Odometry"
  direction: GZ_TO_ROS
- ros_topic_name: "tf"
  gz_topic_name: "/tf"
  ros_type_name: "tf2_msgs/msg/TFMessage"
  gz_type_name: "gz.msgs.Pose_V"
  direction: GZ_TO_ROS
- ros_topic_name: "joint_states"
  gz_topic_name: "/joint_states"
  ros_type_name: "sensor_msgs/msg/JointState"
  gz_type_name: "gz.msgs.Model"
  direction: GZ_TO_ROS
- ros_topic_name: "scan"
  gz_topic_name: "/scan"
  ros_type_name: "sensor_msgs/msg/LaserScan"
  gz_type_name: "gz.msgs.LaserScan"
  direction: GZ_TO_ROS
Add ('share/my_robot_description/worlds', glob('worlds/*.sdf')) and ('share/my_robot_description/config', glob('config/*.yaml')) to the package's data_files, rebuild, and run it:
cd ~/ros2_ws && colcon build --symlink-install --packages-select my_robot_description
source install/setup.bash
ros2 launch my_robot_description sim.launch.py

# Second terminal: drive with the keyboard
ros2 run teleop_twist_keyboard teleop_twist_keyboard

# Third terminal: check the data
ros2 topic hz /scan                      # about 10 Hz
ros2 topic echo /odom --once
ros2 run tf2_ros tf2_echo odom base_footprint
Your own Python nodes from ROS 2 basics can now publish to /cmd_vel exactly as they would on the real robot.
Simulating a lidar: what gpu_lidar computes
A simulated lidar casts rays and reports the distance to the first surface each one hits, plus optional noise. This numpy block does it in 2D, in a 4 m by 3 m room with the box from the world file.
import numpy as np
rng = np.random.default_rng(0)

walls = np.array([[0, 0, 4, 0], [4, 0, 4, 3], [4, 3, 0, 3], [0, 3, 0, 0],      # room
                  [2.25, 1.25, 2.75, 1.25], [2.75, 1.25, 2.75, 1.75],            # box sides
                  [2.75, 1.75, 2.25, 1.75], [2.25, 1.75, 2.25, 1.25]], float)
robot = np.array([0.75, 1.0])
angles = np.radians(np.arange(0, 360, 1.0))                                     # 360 samples
d = np.stack([np.cos(angles), np.sin(angles)], axis=1)

p, s = walls[:, :2], walls[:, 2:] - walls[:, :2]                                 # segment start, direction
q = p[None] - robot                                                             # (rays, walls, 2)
cross = lambda a, b: a[..., 0] * b[..., 1] - a[..., 1] * b[..., 0]
den = cross(d[:, None], s[None])
with np.errstate(divide="ignore", invalid="ignore"):
    t, u = cross(q, s[None]) / den, cross(q, d[:, None]) / den
hit = (t > 0) & (u >= 0) & (u <= 1)
ranges = np.where(hit, t, np.inf).min(axis=1)
ranges = np.clip(ranges + rng.normal(0, 0.01, ranges.size), 0.12, 8.0)           # noise + limits

for name, deg in (("front", 0), ("left", 90), ("back", 180), ("right", 270), ("to box", 22)):
    print(f"{name:7} {deg:3d} deg: {ranges[deg]:.2f} m")
print(f"closest return {ranges.min():.2f} m at {angles[ranges.argmin()] * 180 / np.pi:.0f} deg")
The front ray reaches the far wall at 3.25 m, while the ray at 22 degrees stops at the box about 1.6 m away. The costmaps in ROS 2 navigation with Nav2, the next lesson, are built from exactly this kind of /scan data.
Common Gazebo and ros_gz mistakes
- Following a Gazebo Classic tutorial. If you see
gazebo_ros,spawn_entity.pyorlibgazebo_ros_*.so, it is the old simulator and will not work with Harmonic. - No data on
/scan. The world must load the Sensors system, and the bridge must list the topic. - Nodes ignoring the simulation clock. Without
use_sim_time, TF lookups fail with "extrapolation into the future" errors. - Twist versus TwistStamped. Gazebo's DiffDrive bridge expects
geometry_msgs/msg/Twist. Some newer controllers and Nav2 configurations publishTwistStamped, so check what your publisher sends. - Old Gazebo processes still running. A crashed launch can leave a server alive. Check with
ps aux | grep "gz sim"before relaunching. - Mismatched wheel parameters. The plugin's separation and radius must equal the URDF's.
Simulation is also a good time to revise the loop and timing logic behind the step-size demo; you can solve loop and timing puzzles on Debugshala Test.
Key takeaways
- Gazebo (
gz sim) simulates physics, sensors and worlds; Gazebo Classic is end of life. - Pair Jazzy with Harmonic and Lyrical with Jetty, installed via
ros-<distro>-ros-gz. <gazebo>tags in your xacro add the DiffDrive and JointStatePublisher systems and sensors.- The world must load the Sensors system, and
ros_gz_bridgemust list every topic you need. - Spawn with
ros_gz_sim create -topic robot_description, and setuse_sim_timeon every node.
FAQ
Is Gazebo free to use?
Yes. Gazebo is open-source software released under the Apache 2.0 licence, maintained by Open Robotics and the community. You can use it for learning, research and commercial projects at no cost, and its worlds and models from Gazebo Fuel are also free to download.
What is the difference between Gazebo and Gazebo Classic?
Gazebo Classic is the original simulator, with versions up to 11, and reached end of life in January 2025. The current Gazebo, formerly called Ignition, is a modular rewrite with named releases such as Harmonic and Jetty, a new plugin system, and the gz sim command. ROS 2 Jazzy and newer use the current Gazebo.
Can Gazebo run without a graphics card?
Physics and many plugins run on any computer, and you can start only the server without a window. GPU-based sensors such as gpu_lidar and cameras need working OpenGL, so they may fail or run very slowly on virtual machines. A laptop with integrated graphics is usually enough for a small two-wheeled robot.
Should I learn Gazebo or Isaac Sim?
Start with Gazebo. It is the default simulator in ROS 2 documentation, installs from the ROS repository, and runs on modest hardware. NVIDIA Isaac Sim offers photorealistic rendering and GPU physics but needs an NVIDIA RTX GPU, so it suits later work on perception and large-scale training.
Where can I practise robotics with simulation and hardware in Indore?
The robotics programme at Debugshala's Indore campus is project-based and pairs Python for robotics with real Arduino, ESP32 and Raspberry Pi hardware, sensors, motors and an introduction to ROS 2 nodes and topics. It runs at Old Palasia in English and Hindi, with a free demo class first.
From the team behind this site
Go further with the Robotics Course at Debugshala
These tutorials are written by Debugshala, a training and placement institute at Old Palasia, Indore. The classroom course adds live mentoring, real projects and interview preparation.
- Offline classes at Old Palasia, Indore
- Free demo class before you pay
- Non-IT, fresher and year-gap friendly
- Placement assistance
700+ students placed · 200+ hiring partners · 4.9★ Google rating
