

Bluetooth Controlled Robot with Arduino and HC-05: Full Build
Build a Bluetooth controlled robot with Arduino, HC-05 and L298N: safe wiring, a phone command protocol, a failsafe stop and a Python test of the parser.
Think of a cricket coach at square leg during net practice in Indore. He does not run onto the pitch to move a fielder. He shouts one word, "deeper" or "squarer", and the fielder moves. If the coach goes quiet, a sensible fielder stops and waits rather than running off towards the boundary.
A Bluetooth controlled robot works on the same deal. Your phone is the coach, every message is a short agreed word, and silence means stop.
What is a Bluetooth controlled robot?
Map the nets onto the hardware. The coach's shout is a single character sent by a phone app. The air between them is a Bluetooth serial link.
The fielder's ears are the HC-05 module, which hands each character to the Arduino like a USB serial cable would. The fielder's legs are the L298N driver and two motors. The "stop when the coach is silent" rule is a failsafe timer in your code.
A Bluetooth controlled robot is a remote-controlled mobile robot that receives commands from a phone or computer over a short-range Bluetooth serial link and converts each command into motor actions on a microcontroller.
The project reuses the chassis and motor wiring from the obstacle-avoiding robot. What is new is a communication protocol and a failsafe, both found in every serious robot, from drones to warehouse carts.
How does the HC-05 module work?
The HC-05 speaks classic Bluetooth with the Serial Port Profile (SPP). Once your phone pairs with it, any byte the phone sends comes out of the module's TXD pin as ordinary serial data, at 9600 baud by default. The Arduino cannot tell the difference between this and text typed into the Serial Monitor.
Two facts save you hours. The module's logic runs at 3.3 V even on 5 V breakout boards, so its RXD pin needs a voltage divider. And iPhones do not offer classic SPP to apps, so iPhone users need a BLE module or the ESP32 Wi-Fi robot.
Quick check
Why does the HC-05's RXD pin need a voltage divider when connected to an Arduino Uno?
A 1 kΩ / 2 kΩ divider brings the Uno's 5 V signal down to about 3.3 V, which is safe for the module.
Parts list and wiring
| Part | Quantity | Notes |
|---|---|---|
| 2WD chassis with two geared DC motors, wheels and caster | 1 | The obstacle-avoiding robot chassis is perfect |
| Arduino Uno | 1 | Any ATmega328P board works |
| HC-05 Bluetooth module on a breakout board | 1 | The 6-pin version with an EN/KEY pin and an LED |
| L298N dual motor driver | 1 | Same wiring as the previous project |
| 1 kΩ and 2 kΩ resistors | 1 each | Voltage divider for the HC-05 RXD pin |
| 2 × 18650 cells with holder and switch | 1 set | About 7.4 V |
| An Android phone with a Bluetooth serial or RC controller app | 1 | The app must let you choose which characters each button sends |
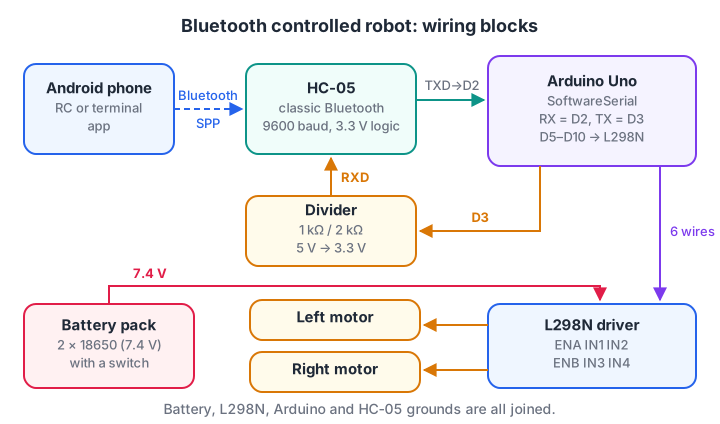
Commands travel phone → HC-05 → Arduino → L298N. The divider protects the HC-05 from the Arduino's 5 V output.
- Motors and driver. Wire the L298N exactly as in the obstacle-avoiding robot: ENA → D5, IN1 → D7, IN2 → D8, ENB → D6, IN3 → D9, IN4 → D10, battery to the driver's motor supply, and the driver's 5V and GND to the Arduino.
- HC-05 power. VCC → 5V, GND → GND.
- HC-05 TXD → Arduino D2. The module's 3.3 V output is high enough for the Arduino to read directly.
- Arduino D3 → HC-05 RXD through a divider. D3 goes to the 1 kΩ resistor, the far end of that resistor goes to RXD, and a 2 kΩ resistor goes from RXD to GND.
- Leave pins 0 and 1 free so you can upload code without unplugging the module.
Check the divider arithmetic, and see why the resistor ratio matters more than the exact values:
def divider(v_in, r_top, r_bottom):
    return v_in * r_bottom / (r_top + r_bottom)

pairs = [(1000, 2000), (2200, 3300), (10000, 20000), (1000, 1000), (0, 2000)]
for top, bottom in pairs:
    v = divider(5.0, top, bottom)
    if v > 3.6:
        verdict = "too high, can damage the HC-05"
    elif v >= 3.0:
        verdict = "good logic HIGH for 3.3 V"
    else:
        verdict = "marginal, may misread bits"
    print(f"top={top:6} ohm  bottom={bottom:6} ohm  ->  {v:.2f} V  {verdict}")
The last row, with no top resistor, is D3 wired straight to RXD. Many modules survive it for a while, which is why the mistake is so common.
How should the phone and robot talk?
A good robot protocol is short, unambiguous and safe when bytes go missing. Single characters meet all three. Many Android RC controller apps use a convention like the one below, and a Bluetooth serial terminal lets you type the same letters.
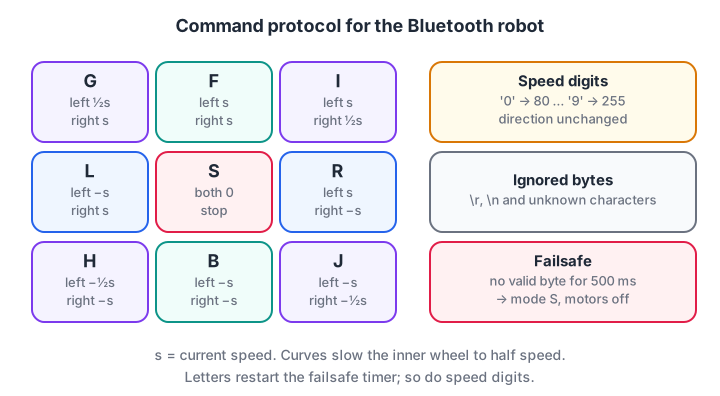
Each letter maps to a pair of wheel speeds; digits only change the speed; silence for 500 ms forces a stop.
The rules your sketch follows:
- A direction letter (F, B, L, R, the four diagonals G, I, H, J, or S for stop) sets the current mode and restarts the failsafe timer.
- A digit from 0 to 9 changes the speed from 80 to 255 PWM without changing direction.
- Anything else, such as the
\rand\nthat terminal apps add, is ignored. - If no valid byte arrives for 500 ms while moving, the robot stops.
Rule 4 assumes your app repeats the command while a button is held. Most RC-style apps do. If yours only sends one letter on press and S on release, raise the timeout or turn on the app's repeat option; never simply delete the failsafe.
Quick check
The phone app stops sending while the robot is driving forward. What should a well-written sketch do?
A failsafe timer stops the robot when commands stop arriving, so a lost link cannot cause a runaway.
The Arduino sketch
// Bluetooth controlled robot: Arduino Uno + HC-05 + L298N
#include <SoftwareSerial.h>

SoftwareSerial bt(2, 3);                 // Arduino RX = D2, TX = D3
const int ENA = 5, IN1 = 7, IN2 = 8;     // left motor
const int ENB = 6, IN3 = 9, IN4 = 10;    // right motor
const unsigned long FAILSAFE_MS = 500;

int speed = 180;
char mode = 'S';
unsigned long lastCmd = 0;

void setMotor(int en, int inA, int inB, int s) {
  digitalWrite(inA, s > 0 ? HIGH : LOW);
  digitalWrite(inB, s < 0 ? HIGH : LOW);
  analogWrite(en, constrain(abs(s), 0, 255));
}

void drive(int left, int right) {
  setMotor(ENA, IN1, IN2, left);
  setMotor(ENB, IN3, IN4, right);
}

void apply(char c) {
  int s = speed, half = speed / 2;       // inner wheel runs at half speed on curves
  switch (c) {
    case 'F': drive(s, s); break;
    case 'B': drive(-s, -s); break;
    case 'L': drive(-s, s); break;       // spin left on the spot
    case 'R': drive(s, -s); break;
    case 'G': drive(half, s); break;     // forward, curving left
    case 'I': drive(s, half); break;     // forward, curving right
    case 'H': drive(-half, -s); break;   // backward, curving left
    case 'J': drive(-s, -half); break;   // backward, curving right
    default:  drive(0, 0); break;        // 'S'
  }
}

void setup() {
  int outs[] = {ENA, IN1, IN2, ENB, IN3, IN4};
  for (int p : outs) pinMode(p, OUTPUT);
  drive(0, 0);
  Serial.begin(9600);                    // USB debugging
  bt.begin(9600);                        // HC-05 default data-mode baud rate
  Serial.println("Waiting for Bluetooth commands");
}

void loop() {
  while (bt.available()) {
    char c = bt.read();
    if (c >= '0' && c <= '9') {
      speed = map(c - '0', 0, 9, 80, 255);
      apply(mode);                       // same direction, new speed
    } else if (c != 0 && strchr("FBLRGIHJS", c)) {
      mode = c;
      apply(mode);
    } else {
      continue;                          // ignore \r, \n and noise
    }
    lastCmd = millis();
    Serial.print("cmd ");
    Serial.println(c);
  }

  if (mode != 'S' && millis() - lastCmd > FAILSAFE_MS) {
    mode = 'S';
    drive(0, 0);
    Serial.println("failsafe stop");
  }
}
The c != 0 check is there because strchr treats the zero byte as part of the string, so a stray zero would otherwise count as a valid command.
Simulate the command parser in Python
The parser and failsafe are pure logic, so you can test them with a fake byte stream. Here the phone repeats the held button every 100 ms, the user sends speed 9 with a terminal-style line ending, curves right, and then walks out of range at 1300 ms.
FAILSAFE_MS = 500
MOVES = {"F": (1, 1), "B": (-1, -1), "L": (-1, 1), "R": (1, -1), "S": (0, 0),
         "G": (0.5, 1), "I": (1, 0.5), "H": (-0.5, -1), "J": (-1, -0.5)}

def run(stream, end_ms):
    speed, current, last, shown = 180, "S", 0, None
    for t in range(0, end_ms + 1, 50):                 # loop() runs every 50 ms
        for ch in stream.get(t, ""):
            if ch.isdigit():
                speed = 80 + int(ch) * (255 - 80) // 9  # '0'..'9' -> 80..255
            elif ch in MOVES:
                current = ch
            else:
                continue                                # ignore '\r', '\n', noise
            last = t
        if current != "S" and t - last > FAILSAFE_MS:
            current = "S"
            print(f"t={t:4} ms  no command for {t - last} ms -> FAILSAFE STOP")
        l, r = MOVES[current]
        cmd = (round(l * speed), round(r * speed))
        if cmd != shown:
            print(f"t={t:4} ms  mode {current}  left={cmd[0]:4}  right={cmd[1]:4}")
            shown = cmd

# The phone repeats the held button every 100 ms; the link drops after 1300 ms
stream = {t: "F" for t in range(0, 600, 100)}
stream[300] = "9\r\n"
stream.update({t: "I" for t in range(600, 1400, 100)})
run(stream, 2000)
The line endings are ignored, the digit raises both wheels to 255, and the curve halves the right wheel. After the last byte at 1300 ms the robot keeps going for just over half a second, then stops itself. Set FAILSAFE_MS to 5000 to see how long a runaway would last.
Pairing, testing and debugging
- Pair the module. Power the robot, open Bluetooth settings on the phone and pair with "HC-05". The usual default PIN is 1234 or 0000.
- Test with a terminal first. Connect from a Bluetooth serial terminal app and type F, then S. Watch the USB Serial Monitor print each command.
- Wheels in the air. Send F, B, L and R in turn and check every direction before the robot touches the floor.
- Map the controller app. Set each on-screen button to send the letters in the diagram, and turn on repeat-while-held if the app offers it.
- Test the failsafe on purpose. Hold F, then switch off the phone's Bluetooth. The robot must stop within about half a second.
If nothing arrives, swap TXD and RXD; TX always goes to RX. If you see garbage characters, the baud rates do not match; most modules use 9600 in data mode, some use 38400.
If the LED keeps blinking fast, the phone is paired but not connected; open the app and connect from inside it. If the robot stutters, motor current may be dipping the supply; add a 470 µF capacitor across the module's power pins.
Ready for some quick practice between builds? Attempt short logic-and-code MCQs on Debugshala Test.
Common mistakes
- No common ground. The HC-05, Arduino and driver must share GND, or serial bits become random.
- Long
delay()calls inloop(). Bytes pile up in SoftwareSerial's 64-byte buffer and the robot reacts late.
Extensions to try next
- Send data back. Print battery voltage or an ultrasonic distance to
btso the app can display it. - Mixed mode. Add a letter that switches between manual control and the autonomous line follower robot behaviour.
- Live tuning. Send messages like
P0.25to change PID gains without re-uploading. - Rename the module. AT command mode lets you change the HC-05's name and PIN, handy when a lab has ten identical robots.
Key takeaways
- The HC-05 turns Bluetooth into a plain serial stream, read on D2 and D3 with SoftwareSerial.
- Protect the module's 3.3 V RXD pin with a 1 kΩ / 2 kΩ divider and share ground everywhere.
- Single-letter commands for direction and digits for speed make a simple, robust protocol.
- A 500 ms failsafe stop is not optional; test it deliberately.
- iPhones need BLE or Wi-Fi, which the ESP32 project covers next.
FAQ
Can I control an HC-05 robot from an iPhone?
No, not directly. iOS does not expose classic Bluetooth Serial Port Profile to ordinary apps, and the HC-05 only speaks classic Bluetooth. Use a BLE module such as the HM-10, an ESP32 with BLE, or a Wi-Fi robot that any phone can control from a web browser.
What is the range of an HC-05 Bluetooth robot?
Expect roughly 10 metres in open space and noticeably less through walls or near metal furniture. Range also drops when the module sits behind the motors. That uncertainty is why the sketch includes a failsafe stop.
What is the difference between HC-05 and HC-06?
Both are classic Bluetooth serial modules that work the same way for this robot. The HC-05 can act as a master or a slave and has a KEY or EN pin for AT mode, while the HC-06 is slave-only. For phone control, either works with the same sketch.
Why does my Bluetooth robot receive wrong characters?
Wrong characters almost always mean a baud-rate mismatch, a missing ground, or a 5 V signal without a divider. Check that bt.begin() matches the module's data-mode rate, usually 9600, confirm that every ground is joined, and add the divider on the RXD line.
Can I learn Bluetooth and Wi-Fi robot control in Indore?
Yes. Wireless control with Bluetooth and Wi-Fi on Arduino and ESP32 is covered in the Bluetooth and Wi-Fi lessons in Debugshala's robotics course at the Old Palasia campus. You build and debug robots hands-on, with teaching in English and Hindi, and you can attend a free demo class before you pay anything.
From the team behind this site
Go further with the Robotics Course at Debugshala
These tutorials are written by Debugshala, a training and placement institute at Old Palasia, Indore. The classroom course adds live mentoring, real projects and interview preparation.
- Offline classes at Old Palasia, Indore
- Free demo class before you pay
- Non-IT, fresher and year-gap friendly
- Placement assistance
700+ students placed · 200+ hiring partners · 4.9★ Google rating
