

Raspberry Pi Camera Projects: Picamera2 Timelapse and Motion
Raspberry Pi camera projects with Picamera2: set up Camera Module 3, build a timelapse, a motion-detecting camera and a robot dashcam, with numpy demos.
Think about the watchman at the gate of a housing society in Vijay Nagar. He does not write down everything he sees. He sits quietly, and only when something changes, a car arriving or a stranger walking in, does he note the time and look closely.
A camera on a robot needs the same habit. A Camera Module produces millions of numbers every second. A useful camera project decides which of those numbers matter, keeps those, and ignores the rest.
What is a Raspberry Pi camera project?
Map the watchman onto the hardware. His eyes are the camera sensor. His habit of glancing every few seconds is a capture loop. His "something changed" is a comparison between two frames. His notebook is the SD card where you save photos or video.
A Raspberry Pi camera project is a program that uses a camera connected to a Raspberry Pi single-board computer to capture images or video and process them, for tasks such as timelapse, security monitoring, robot vision or inspection.
The Raspberry Pi suits this job because it runs full Linux and Python, unlike the microcontrollers in the earlier projects. The comparison is in Arduino vs ESP32 vs Raspberry Pi. On a robot, the usual split is a Pi for the camera and decisions, and an Arduino for the motors, like the arm in the robotic arm project.
What you need
| Part | Notes |
|---|---|
| Raspberry Pi 5 or Pi 4 | A Pi 5 is noticeably faster for image processing |
| Raspberry Pi Camera Module 3 | 12 MP with autofocus; the wide and NoIR versions also work |
| The right ribbon cable | The Pi 5 has smaller camera connectors and needs a Pi 5 camera cable |
| microSD card with Raspberry Pi OS | Bookworm or later; the desktop image has Picamera2 preinstalled |
| Official power supply | 5 V, 5 A for a Pi 5; a weak supply causes random crashes |
How does the Pi camera software stack work?
Raspberry Pi OS uses libcamera, an open-source camera framework. The sensor sends raw data to the Pi's image signal processor (ISP), which handles exposure, white balance, denoising and colour. On top of libcamera sit two tools you will use.
- rpicam-apps: command-line programs such as
rpicam-hello,rpicam-stillandrpicam-vid. Older guides call themlibcamera-helloand so on. - Picamera2: the official Python library. It hands you each frame as a numpy array, which is what makes it so easy to combine with OpenCV and your own code.
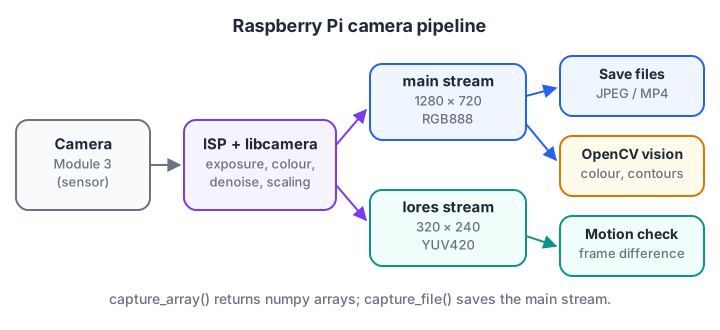
One camera can give you two streams at once: a large one to save and a small one to analyse quickly.
That two-stream idea is the key to fast projects. A 320 × 240 "lores" frame has about 77,000 pixels, while a 1280 × 720 frame has over 900,000. Analyse the small one and save the large one only when something interesting happens.
Set up and test the camera
- Power off the Pi. Never connect a camera ribbon to a running board.
- Connect the cable. Lift the connector's latch, insert the ribbon fully with the contacts facing the right way for your board, and press the latch down.
- Boot and update. Run
sudo apt update && sudo apt full-upgrade. - List cameras. Run the first command below. It should name your sensor (the Camera Module 3 reports
imx708). - Take a test photo. Run the second command and open
test.jpg.
rpicam-hello --list-cameras
rpicam-still -o test.jpg
sudo apt install -y python3-picamera2 # only needed on Lite imagesAn image is just an array
Before the projects, see how the camera's output looks to your code. A greyscale frame is a 2D numpy array of brightness values from 0 to 255; a colour frame adds a third dimension for the three channels. Most camera tricks are array operations on these numbers. If numpy is new to you, read numpy arrays explained.
import numpy as np

# A tiny 6 x 8 greyscale "photo": a bright parcel on a dim floor (0 = black, 255 = white)
img = np.array([
    [ 40,  42,  45,  44,  41,  40,  39,  38],
    [ 41,  44, 180, 200, 190,  43,  40,  39],
    [ 43,  46, 210, 230, 220,  47,  42,  40],
    [ 42,  45, 190, 215, 205,  46,  41,  40],
    [ 40,  43,  47,  49,  46,  44,  40,  39],
    [ 39,  41,  44,  45,  43,  41,  39,  38],
], dtype=np.uint8)

print("shape (rows, cols):", img.shape, " mean brightness:", round(img.mean(), 1))
mask = img > 128                                  # threshold: bright = True
print(mask.astype(int))
rows, cols = np.nonzero(mask)
print("object pixels:", mask.sum(), " rows", rows.min(), "to", rows.max(),
      " cols", cols.min(), "to", cols.max())

brighter = np.clip(img.astype(int) * 2, 0, 255)  # what too much gain does
print("pixels clipped at 255 after 2x gain:", int((brighter == 255).sum()))
Thresholding turns the photo into a yes/no mask, and the mask's rows and columns give the object's bounding box. The last line shows why exposure matters: doubling the gain pushes every parcel pixel to 255, and the detail inside the object is lost for good.
Three Raspberry Pi camera projects to build
Project 1: a timelapse camera
A timelapse takes a photo every few seconds and plays them back quickly, a gentle first project that only captures and saves.
import time
from picamera2 import Picamera2

picam2 = Picamera2()
picam2.configure(picam2.create_still_configuration(main={"size": (1920, 1080)}))
picam2.start()
time.sleep(2)                          # let auto exposure and white balance settle

for i in range(1, 121):                # 120 photos, one every 30 s = 1 hour
    picam2.capture_file(f"plant_{i:03d}.jpg")
    print("saved", i)
    time.sleep(30)

picam2.stop()
Join the photos into a video with ffmpeg, at 24 frames per second:
ffmpeg -framerate 24 -i plant_%03d.jpg -c:v libx264 -pix_fmt yuv420p timelapse.mp4If the brightness flickers between frames, auto exposure is adjusting each shot. Fix it after the warm-up with picam2.set_controls({"AeEnable": False, "AwbEnable": False}).
Project 2: a motion-detecting security camera
This is the watchman in code. The camera runs two streams. Every 0.1 seconds the program compares the small greyscale frame with the previous one, counts how many pixels changed a lot, and saves a full-size photo when enough have.
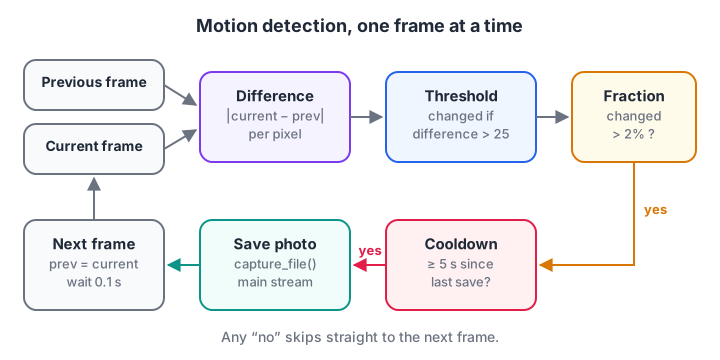
Difference, threshold, count, then decide. The cooldown stops one event saving fifty photos.
import time
import numpy as np
from picamera2 import Picamera2

picam2 = Picamera2()
config = picam2.create_preview_configuration(
    main={"size": (1280, 720), "format": "RGB888"},
    lores={"size": (320, 240), "format": "YUV420"})
picam2.configure(config)
picam2.start()
time.sleep(2)

w, h = 320, 240
prev, last_save = None, 0
while True:
    grey = picam2.capture_array("lores")[:h, :w].astype(np.int16)  # Y plane = brightness
    if prev is not None:
        fraction = (np.abs(grey - prev) > 25).mean()               # share of changed pixels
        if fraction > 0.02 and time.time() - last_save > 5:
            name = time.strftime("motion_%Y%m%d_%H%M%S.jpg")
            picam2.capture_file(name)                               # full-size main stream
            print(f"motion {fraction:.1%} -> saved {name}")
            last_save = time.time()
    prev = grey
    time.sleep(0.1)
The YUV420 format stores brightness (the Y plane) first, so slicing the first h rows gives a ready-made greyscale image. Converting to int16 before subtracting matters: with uint8, 10 − 20 wraps round to 246 instead of giving −10.
Here is the same logic on simulated frames, so you can tune the threshold, the 2% trigger and the cooldown without a camera:
import numpy as np
rng = np.random.default_rng(1)
H, W, THRESH, MIN_FRACTION, COOLDOWN = 24, 32, 25, 0.02, 3

def frame(t):
    img = 60 + rng.normal(0, 4, (H, W))            # dim room plus sensor noise
    if 4 <= t <= 8:                                # a person walks across
        x = 4 + (t - 4) * 5
        img[6:20, x:x + 5] = 170
    return img.astype(np.int16)

prev, last_saved = frame(0), -99
for t in range(1, 12):                             # one frame every 0.5 s
    cur = frame(t)
    changed = np.abs(cur - prev) > THRESH
    fraction = changed.mean()
    action = ""
    if fraction > MIN_FRACTION:
        action = "SAVE photo" if t - last_saved >= COOLDOWN else "motion (cooldown)"
        if action == "SAVE photo":
            last_saved = t
    print(f"frame {t:2}: {fraction:6.1%} of pixels changed  {action}")
    prev = cur
Sensor noise alone never crosses the threshold, so frames 1 to 3 stay quiet. The walker triggers a save at frame 4, the cooldown suppresses the next two, and a second save comes at frame 7. Set THRESH to 5 and the noise starts triggering by itself, a common cause of a camera that fills the SD card overnight.
Project 3: a robot dashcam
On a moving robot, a short video of each run is the best debugging tool you have: when the line follower leaves the track, the video shows why.
from picamera2 import Picamera2

picam2 = Picamera2()
picam2.start_and_record_video("run.mp4", duration=10)   # records 10 s, then stops
picam2.close()
start_and_record_video picks the right encoder and container from the file extension. For longer runs, record at 1280 × 720 to keep files small, and mount the camera low and tilted slightly down so the floor ahead fills the frame.
Quick check
Why does the motion camera analyse the 320 × 240 lores stream instead of the 1280 × 720 main stream?
Analysing the small stream keeps the loop fast, and the full-size stream is saved only when motion is found.
Quick check
Why convert frames to int16 before subtracting them?
In uint8, 10 − 20 becomes 246. A signed type keeps the true difference.
Testing and debugging
"No cameras available" almost always means the cable: check that it is fully inserted at both ends, the right way round, and the right type for a Pi 5. "Device or resource busy" means another program, often a previous script, still holds the camera; close it or reboot.
Pictures are blurry: the Camera Module 3 has autofocus, so give it a second after starting, or set picam2.set_controls({"AfMode": 2}) for continuous focus. Colours look blue in OpenCV: OpenCV expects BGR order. Picamera2's RGB888 format already stores pixels as B, G, R in memory, so you can pass it to OpenCV directly; with PIL, convert first.
For a breather between captures, try quick numpy and logic quizzes on Debugshala Test.
Extensions to try next
- Send alerts. When the motion camera saves a photo, publish a message over MQTT to your phone.
- Track colours. Find a coloured ball and steer towards it, the first project in computer vision for robots with OpenCV.
- Stream to a phone. The official Picamera2 examples include an MJPEG streaming server you can adapt for a robot's first-person view.
- On-device AI. Run a small object detector on the Pi to recognise people or parcels, not just motion.
Key takeaways
- Raspberry Pi OS uses libcamera, with rpicam-apps for the command line and Picamera2 for Python.
- Install Picamera2 from apt, and use
--system-site-packagesif you work in a venv. - Every frame is a numpy array; thresholding and differencing are simple array operations.
- Analyse a small stream, save the large one, and use a cooldown to avoid floods of photos.
- Most "camera not found" errors are cable problems.
FAQ
Which camera should I use with a Raspberry Pi?
For most projects, the Raspberry Pi Camera Module 3 is the best starting point: 12 MP, autofocus, good low-light performance and full support in Picamera2. Pick the wide version for robots that need a broad view, and the NoIR version with infrared lighting for night-time monitoring.
Can I use a USB webcam instead of a Camera Module?
Yes. A USB webcam appears as a standard video device, and OpenCV's VideoCapture can read it. You lose Picamera2's dual streams and fine camera controls, and some webcams use more CPU. A Camera Module is usually better for robots, while a webcam is fine for a quick desk test.
Does Picamera2 work with Raspberry Pi OS Lite?
Yes. Picamera2 is not preinstalled on Lite images, so install it with sudo apt install python3-picamera2 --no-install-recommends. That skips the desktop preview windows, which a headless robot does not need anyway. Save images to files or stream them instead of opening a preview.
Why is my Raspberry Pi camera image dark or flickering?
The camera's auto exposure needs a moment to settle after starting, so wait one or two seconds before capturing. Flicker under tube lights comes from the mains frequency; India uses 50 Hz, and matching the exposure time to multiples of 10 ms reduces banding. For timelapses, lock exposure and white balance after the warm-up.
Where can I learn Raspberry Pi camera projects in Indore?
Raspberry Pi with a camera for basic computer vision is part of Debugshala's Raspberry Pi and camera robotics sessions, within its project-based Robotics course at the Old Palasia campus. You also learn Python for robotics, sensors, motor control and ROS 2 basics, with a free demo class before you join.
From the team behind this site
Go further with the Robotics Course at Debugshala
These tutorials are written by Debugshala, a training and placement institute at Old Palasia, Indore. The classroom course adds live mentoring, real projects and interview preparation.
- Offline classes at Old Palasia, Indore
- Free demo class before you pay
- Non-IT, fresher and year-gap friendly
- Placement assistance
700+ students placed · 200+ hiring partners · 4.9★ Google rating
