

Arduino vs ESP32 vs Raspberry Pi: Which Board for Your Robot?
Arduino vs ESP32 vs Raspberry Pi compared: CPU, RAM, GPIO, ADC, Wi-Fi and power, when to pick each one, plus Arduino, MicroPython and Raspberry Pi code.
Think about two people working in a sweet shop in Chhappan Dukan. One is the person at the jalebi kadhai. He does one job, the same way, all day: pour batter, flip, lift out at exactly the right moment. He never gets distracted and his timing is perfect.
The other is the shop manager. She handles the billing system, answers calls, checks stock, updates the online menu and talks to suppliers. She can do far more complicated work, but if you ask her to flip jalebis with perfect timing while also answering the phone, a few will burn.
Robot boards come in the same two personalities. The jalebi maker is a microcontroller. The manager is a single-board computer.
Microcontroller vs single-board computer
Map the shop onto the boards. The jalebi maker's single, repeated routine is your Arduino or ESP32 sketch, running in an endless loop. The manager's many simultaneous jobs are the processes on a Raspberry Pi's Linux operating system. The kadhai's exact timing is real-time control of motors and sensors.
A microcontroller is a single chip that contains a processor, memory and input/output pins and runs one program directly without an operating system, while a single-board computer is a complete computer on one board that runs a full operating system such as Linux.
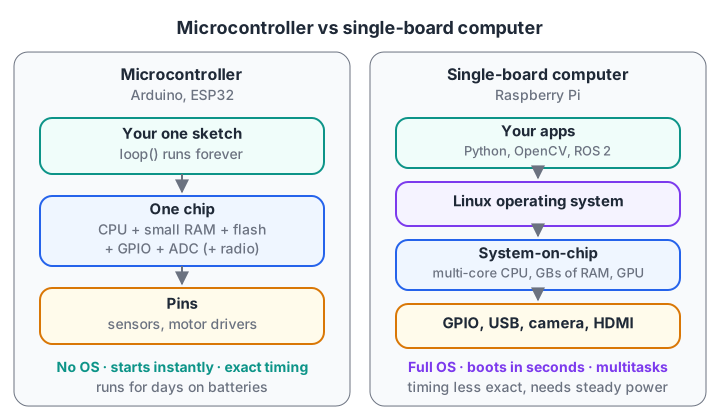
A microcontroller runs your code right on the hardware. A Raspberry Pi puts an operating system between your code and the pins.
That one difference explains most of the trade-offs. With no operating system, a microcontroller starts running your code within moments of power-on and nothing interrupts it unexpectedly, so it can produce a pulse exactly 10 microseconds long.
Linux on a Raspberry Pi takes several seconds to boot and may pause your program briefly to do other work, but it gives you a file system, networking, a camera stack, Python with any library, and the ability to run many programs at once.
Arduino vs ESP32 vs Raspberry Pi comparison table
The figures below are typical for the most common boards (classic Arduino Uno, an ESP32 development board, and a Raspberry Pi 4 or 5). Exact numbers vary by model and revision, so check the official datasheet for your board.
| Feature | Arduino Uno (classic) | ESP32 dev board | Raspberry Pi 4 / 5 |
|---|---|---|---|
| Type | Microcontroller | Microcontroller | Single-board computer |
| CPU | 8-bit AVR, 16 MHz | 32-bit, one or two cores, up to 240 MHz | 64-bit quad-core ARM, well above 1 GHz |
| RAM | 2 KB | A few hundred KB (some modules add PSRAM) | 1 GB to 16 GB, depending on model |
| Operating system | None, your sketch runs directly | None needed (FreeRTOS runs underneath the Arduino core) | Linux (Raspberry Pi OS, Ubuntu) |
| GPIO | 14 digital pins, 6 with PWM | Around two dozen usable pins, PWM on most | 40-pin header, 26 GPIO |
| Logic voltage | 5 V | 3.3 V | 3.3 V (pins are not 5 V tolerant) |
| ADC (analog input) | 6 channels, 10-bit | Many channels, 12-bit, somewhat non-linear | None built in; add an ADC chip |
| Wi-Fi / Bluetooth | No (some newer Uno variants add it) | Yes, both on the original ESP32 | Yes, on most current models |
| Power use | Very low | Low; rises when Wi-Fi is active, tiny in deep sleep | A few watts; needs a solid 5 V supply |
| Cost range | Low | Low | Moderate, several times a microcontroller |
| Best use | Learning electronics, simple robots, motor control | Connected robots, app or web control, IoT | Vision, ROS 2, AI, the robot's main "brain" |
Two rows deserve a second look. The ADC row explains why a Raspberry Pi cannot read a potentiometer or an analog sensor on its own. The logic voltage row explains why connecting a 5 V sensor's output straight to an ESP32 or Pi pin can damage it: you need a voltage divider or level shifter.
Quick check
Your robot must stream camera video and run ROS 2. Which board fits best?
Vision and ROS 2 need a Linux computer with plenty of RAM, which is what a single-board computer offers.
When to pick which board
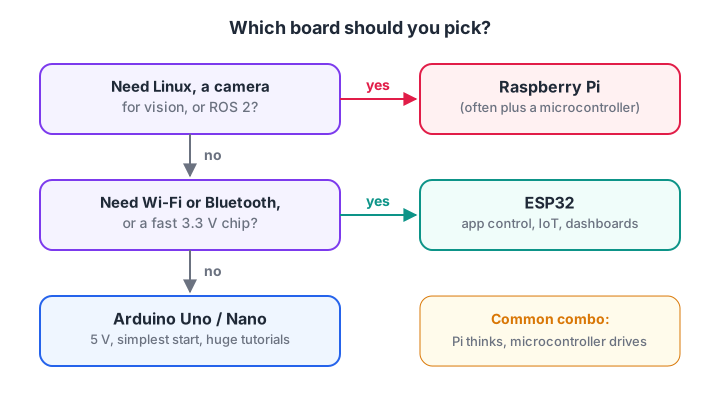
Start from what the robot needs, not from which board is most powerful.
Pick an Arduino Uno or Nano for your first line follower or obstacle-avoiding robot. Most beginner modules are designed for 5 V, the tutorials are endless, and there is very little that can go wrong in software.
Pick an ESP32 when the robot must talk to a phone, a web dashboard or another device. A robot car controlled from a browser, a sensor that posts readings over Wi-Fi, or a Bluetooth gamepad-driven bot are all natural ESP32 projects. It also has more memory and speed than a classic Uno, which helps with larger programs.
Pick a Raspberry Pi when the robot needs to see, map or plan: reading a camera with OpenCV, running a small neural network, or running ROS 2. The ROS 2 basics guide assumes this kind of Linux machine.
Use both for anything serious. The Pi does the high-level thinking ("there is a person ahead, slow down") and sends simple commands over USB serial to a microcontroller that handles precise motor timing and encoder counting. This split is common in real mobile robots, from university projects to commercial ones.
Code on each board
Arduino sketch: blink and read a sensor
Arduino code is C++ with a few helpers. setup() runs once and loop() runs forever. This sketch reads a potentiometer or analog sensor on pin A0, prints the voltage, and turns the built-in LED on above a threshold.
const int SENSOR_PIN = A0;
const float VREF = 5.0;           // classic Uno: 5 V reference

void setup() {
  pinMode(LED_BUILTIN, OUTPUT);
  Serial.begin(9600);
}

void loop() {
  int raw = analogRead(SENSOR_PIN);          // 0 to 1023 (10-bit)
  float volts = raw * VREF / 1023.0;

  digitalWrite(LED_BUILTIN, volts > 2.5 ? HIGH : LOW);

  Serial.print("raw=");
  Serial.print(raw);
  Serial.print("  volts=");
  Serial.println(volts, 2);
  delay(200);
}
Open the Serial Monitor at 9600 baud and turn the knob: the numbers change and the LED switches at the halfway point.
MicroPython on an ESP32
ESP32 boards can also run MicroPython, a small version of Python for microcontrollers. This needs real hardware, so it has no Run button here.
from machine import Pin, ADC
import time

led = Pin(2, Pin.OUT)        # many ESP32 dev boards have an LED on GPIO 2
sensor = ADC(Pin(34))        # GPIO 34 is an input-only ADC pin
sensor.atten(ADC.ATTN_11DB)  # widen the range to roughly 0 to 3.3 V

while True:
    raw = sensor.read_u16()          # scaled to 0..65535
    volts = raw * 3.3 / 65535
    led.value(1 if volts > 1.5 else 0)
    print(raw, round(volts, 2))
    time.sleep_ms(200)
On the ESP32 port, sensor.read_uv() returns a calibrated reading in microvolts, which is more accurate than scaling read_u16() yourself.
Raspberry Pi with gpiozero
On a Raspberry Pi, the gpiozero library is the friendliest way to use pins, and it works on current models including the Pi 5. Remember that the HC-SR04 sensor's echo pin outputs 5 V, so it needs a voltage divider before it reaches the Pi.
from gpiozero import LED, DistanceSensor
from time import sleep

led = LED(17)                                      # BCM pin numbers
sonar = DistanceSensor(echo=24, trigger=23, max_distance=2)

while True:
    cm = sonar.distance * 100                      # .distance is in metres
    if cm < 20:
        led.on()
    else:
        led.off()
    print(f"{cm:.1f} cm")
    sleep(0.1)
Turning ADC readings into voltage and distance
An ADC (analog-to-digital converter) turns a voltage into a whole number. A 10-bit ADC gives 1024 steps (0 to 1023); a 12-bit one gives 4096. The formula is the same on every board: volts = raw × reference voltage / max reading.
Many analog distance sensors, such as the popular Sharp infrared ones, output a higher voltage when an object is closer, and the relationship is curved, not straight.
A practical approach is a calibration table plus interpolation. The table below holds approximate points in the style of a typical datasheet curve; you should measure your own sensor at a few known distances.
import numpy as np

def to_volts(raw, vref, bits):
    return raw * vref / (2 ** bits - 1)

# Calibration: sensor voltage at known distances (approximate, measure your own)
cal_volts = np.array([0.40, 0.60, 0.75, 0.90, 1.30, 2.30])
cal_cm    = np.array([80,   50,   40,   30,   20,   10])

def volts_to_cm(v):
    return float(np.interp(v, cal_volts, cal_cm))   # cal_volts must increase

readings = [("Arduino Uno", 470, 5.0, 10), ("ESP32", 1180, 3.3, 12), ("Arduino Uno", 120, 5.0, 10)]
for board, raw, vref, bits in readings:
    v = to_volts(raw, vref, bits)
    print(f"{board:12} raw={raw:5} -> {v:.3f} V -> about {volts_to_cm(v):5.1f} cm")

print("\nSmallest voltage step:")
print(f"  Uno 10-bit at 5.0 V   : {to_volts(1, 5.0, 10) * 1000:.2f} mV")
print(f"  ESP32 12-bit at 3.3 V : {to_volts(1, 3.3, 12) * 1000:.2f} mV")
The last two lines show resolution: the ESP32 can tell apart much smaller voltage changes, although its ADC is less linear near the ends of its range, so calibration matters even more there.
Quick check
A 10-bit ADC with a 5 V reference reads 512. What is the voltage, roughly?
512 × 5 / 1023 ≈ 2.50 V, about halfway through the range.
Common mistakes when choosing a board
- Feeding 5 V signals into 3.3 V pins. ESP32 and Raspberry Pi pins can be damaged. Use a divider or level shifter.
- Expecting a Raspberry Pi to read analog sensors. It has no ADC. Add one, or let a microcontroller read the sensor.
- Using the ESP32's ADC2 pins with Wi-Fi on. On the original ESP32, ADC2 is unavailable while Wi-Fi runs, so put analog sensors on ADC1 pins.
- Under-powering the Pi. A weak phone charger causes random freezes and SD card corruption. Use the recommended supply.
- Choosing the most powerful board by default. A Pi for a simple line follower adds boot time, power draw and complexity with no benefit.
Key takeaways
- Microcontrollers run one program without an OS; single-board computers run Linux and many programs.
- Arduino is the easiest start, ESP32 adds wireless and speed at 3.3 V, and Raspberry Pi adds real computing.
- Check logic voltage and ADC availability before wiring sensors.
volts = raw × reference / maxworks on every board; curved sensors need a calibration table.- Serious robots often pair a Raspberry Pi for thinking with a microcontroller for motors.
FAQ
Is ESP32 better than Arduino for beginners?
ESP32 is more capable, but a classic Arduino is often easier for the very first project because most beginner modules expect 5 V and examples are everywhere. Once you are comfortable with digital and analog pins, moving to ESP32 is straightforward, and it can even be programmed with the same Arduino IDE.
Can a Raspberry Pi replace an Arduino in a robot?
It can drive simple motors and read digital sensors, but it has no analog inputs and its timing is less exact because Linux is multitasking. For precise motor control and encoder counting, a microcontroller alongside the Pi usually gives a more reliable robot.
Should I learn C++ or Python for robot boards?
Both are useful. Arduino sketches use C++, while MicroPython and Raspberry Pi projects use Python. If you are new to programming, Python's variables and literals and loops carry over neatly, and C++ syntax is easier once the logic is familiar. You can practise coding questions on Debugshala Test to build that base.
Where can I learn Arduino, ESP32 and Raspberry Pi in Indore?
The project-based robotics programme at Debugshala covers Arduino and ESP32 microcontrollers (digital and analog I/O, Wi-Fi and Bluetooth) and Raspberry Pi with a camera for basic computer vision, taught at the Old Palasia campus in English and Hindi. A free demo class is available before you enrol.
From the team behind this site
Go further with the Robotics Course at Debugshala
These tutorials are written by Debugshala, a training and placement institute at Old Palasia, Indore. The classroom course adds live mentoring, real projects and interview preparation.
- Offline classes at Old Palasia, Indore
- Free demo class before you pay
- Non-IT, fresher and year-gap friendly
- Placement assistance
700+ students placed · 200+ hiring partners · 4.9★ Google rating
