

Components of a Robot: Parts, Functions and How They Connect
Understand the components of a robot: chassis, motors, drivers, sensors, controller, battery and wiring, plus Python to size the battery and motor torque.
Think of a Vikram tempo, the shared auto that runs between Rajwada and Palasia. It has a body and wheels, an engine, gauges on the dashboard, a driver who decides where to go, a fuel tank, and wires and cables that carry signals from the pedals and switches to the engine and lights.
Take any one of those away and it stops working. A great engine with an empty tank goes nowhere. A full tank with a broken throttle cable is just as stuck.
A robot is put together the same way. Its parts fall into a few families, and the interesting engineering happens where those families meet.
What are the components of a robot?
Map the tempo onto a robot. The body and wheels are the mechanical structure. The engine is the actuator, and the gearbox that trades speed for pulling power is part of it. The gauges are sensors.
The driver is the controller, a microcontroller or small computer running your program. The fuel tank is the battery and the regulators that feed each part. The cables are the communication links: wires carrying digital signals, analog voltages and serial data.
The components of a robot are its mechanical structure, actuators and drivers, sensors, controller, power system and communication links, which together let it sense its surroundings, decide what to do and move.
The what is robotics introduction gives a quick overview of these blocks. Whichever of the types of robots you build, arm or cart, it contains these families. This article goes one level deeper: what each block contains, what its ratings mean, and how to choose parts that work together.
Bill of materials for a two-wheel robot
Here is a typical parts list for a beginner's two-wheel robot, grouped by subsystem.
| Subsystem | Part | What it does | Key rating to check |
|---|---|---|---|
| Mechanical | Acrylic or aluminium chassis, 2 wheels of 65 mm, 1 caster | Holds everything, meets the floor | Weight, mounting holes |
| Actuators | 2 DC gear motors (for example 1:48 "TT" motors) | Turn the wheels | Voltage, speed (RPM), torque, stall current |
| Driver | Dual H-bridge such as TB6612FNG or L298N | Lets a weak logic pin control a strong motor current | Current per channel, voltage drop |
| Sensors | HC-SR04 ultrasonic, 2 IR line sensors, optional encoders | Measure distance, line position, wheel turns | Operating voltage, output type |
| Controller | Arduino Uno, Nano or ESP32 | Runs the sense–think–act loop | Logic voltage (5 V or 3.3 V), pin count |
| Power | 2-cell Li-ion pack (7.4 V nominal), switch, fuse, 5 V regulator | Feeds motors and logic | Capacity (mAh), maximum current |
| Communication | Jumper wires, USB cable, optional Bluetooth module | Carry signals and let you program it | Correct pins, common ground |
Choosing between an Arduino, an ESP32 and a Raspberry Pi is a decision of its own, covered in Arduino vs ESP32 vs Raspberry Pi.
How power and signals flow through a robot
The most useful picture of a robot is not its outline but its wiring map. Two kinds of connection run through it: power paths that carry current to make things move, and signal paths that carry information.
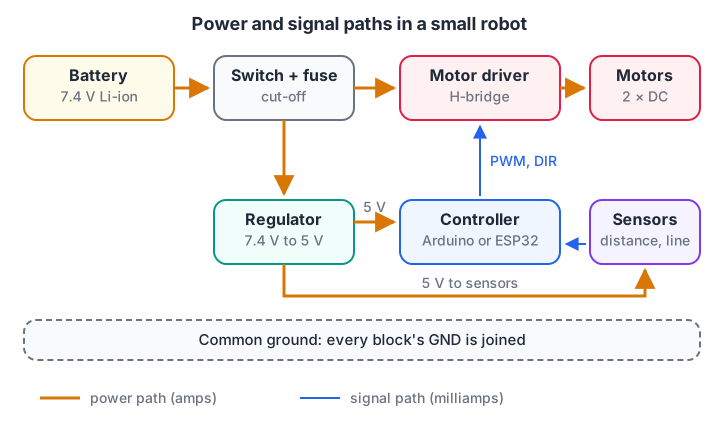
Thick power lines carry amps; thin signal lines carry information. Every block shares one ground so the signals mean the same thing everywhere.
The power path
Motors draw far more current than anything else, often 0.2 A each when cruising and over 1 A when stalled. So the battery feeds the motor driver directly.
A separate regulator, often a small buck converter, drops the battery voltage to a clean 5 V or 3.3 V for the controller and sensors. A switch and a fuse sit right after the battery so you can cut power quickly and a short circuit cannot melt a wire.
The signal path
Signals carry information at low current. The controller sends PWM and direction signals to the driver, and receives readings from sensors. The driver acts like a relay operated by a finger: a few milliamps from the controller's pin switch the motor's much larger current.
The common ground
A voltage is always measured between two points. If the controller's ground and the driver's ground are not connected, a "HIGH" from the controller means nothing to the driver. Tie every ground together, and route motor ground wires back to the battery separately from the logic ground where you can, so motor noise does not upset the controller.
Signal types and the parts that use them
Each sensor or module speaks one of a few electrical "languages". Knowing which one tells you which controller pin to use.
| Signal type | What it carries | Example parts | Controller pin |
|---|---|---|---|
| Digital input/output | On or off, HIGH or LOW | IR line sensor (digital output), buttons, LEDs | Any GPIO pin |
| Analog | A voltage that varies smoothly | Potentiometer, analog IR sensor, battery monitor | ADC pin (A0 to A5 on an Uno) |
| PWM | Fast on-off switching with a varying duty cycle | Motor speed, servo position | PWM-capable pins (marked ~ on an Uno) |
| Pulse timing | The length of a pulse is the reading | HC-SR04 echo, encoders | Digital pin, ideally interrupt-capable |
| UART serial | Bytes sent one after another on TX and RX | Bluetooth modules, GPS, a link to a Raspberry Pi | TX and RX pins |
| I2C | Many devices on two shared wires, each with an address | IMU such as MPU-6050, OLED screens | SDA and SCL |
| SPI | Fast data on four wires | SD cards, some displays and radios | MOSI, MISO, SCK, CS |
Quick check
Which connection type lets an IMU and an OLED screen share the same two wires?
I2C uses two shared lines (SDA and SCL), and each device on the bus has its own address.
Sizing the power system
A robot that dies after six minutes, or resets every time the motors start, almost always has a power problem. Estimate the current budget before you buy a battery.
- List every part and its typical current draw from the datasheet.
- Add them up for normal running, and separately for the worst case (both motors stalled).
- Divide battery capacity by the normal draw to get the running time, then take off about 20 percent because you should not drain a pack fully.
- Check that the battery and every wire can supply the worst-case current without overheating.
# Typical currents in milliamps (check your own datasheets)
parts = {
    "Arduino Uno":         50,
    "HC-SR04 sensor":      15,
    "2 IR line sensors":   40,
    "Bluetooth module":    40,
    "2 motors cruising":  2 * 250,
}
stall_extra = 2 * (1200 - 250)       # extra draw if both motors stall

capacity_mah = 2000                  # 2-cell 18650 Li-ion pack
usable = 0.8                         # keep 20% in reserve

normal = sum(parts.values())
for name, ma in parts.items():
    print(f"{name:<20}{ma:>6} mA  {ma / normal:5.0%}")
print(f"{'Normal total':<20}{normal:>6} mA")
print(f"{'Worst case':<20}{normal + stall_extra:>6} mA")
minutes = capacity_mah * usable / normal * 60
print(f"Estimated run time: {minutes:.0f} minutes")
Motors take about 78 percent of the budget, which is why choosing efficient motors and a low-loss driver matters more than shaving milliamps off the sensors. The worst case of about 2.5 A is also the current your switch, fuse and wires must handle.
Choosing motors: torque, speed and the gearbox
A bare DC motor spins fast but weakly. A gearbox reduces the speed and multiplies the torque by roughly the gear ratio, minus some friction losses.
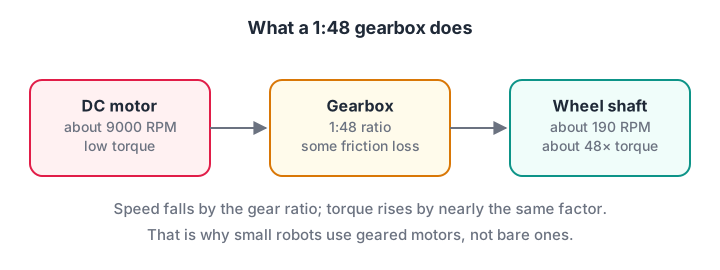
A gearbox trades speed for torque. Speed falls by the gear ratio and torque rises by nearly the same factor.
To check a motor, work out the force needed to push the robot, multiply by the wheel radius, and compare it with the motor's rated torque. The runnable block below does this for a 1.2 kg robot climbing a gentle ramp.
import math

mass_kg = 1.2            # robot with battery
wheel_radius_m = 0.0325  # 65 mm wheels
slope_deg = 10           # a ramp or a door threshold
accel = 0.5              # m/s^2, how quickly you want to speed up
rolling = 0.03           # rolling resistance on a smooth floor
g = 9.81

force = mass_kg * (g * math.sin(math.radians(slope_deg))
                   + rolling * g * math.cos(math.radians(slope_deg))
                   + accel)
torque_per_motor = force * wheel_radius_m / 2       # two driven wheels
kgcm = torque_per_motor / g * 100                   # newton-metres to kg-cm

rated_kgcm = 0.8         # read this from your motor's datasheet
print(f"Force needed: {force:.2f} N")
print(f"Torque per motor: {torque_per_motor:.3f} N·m = {kgcm:.2f} kg·cm")
print(f"Safety margin: {rated_kgcm / kgcm:.1f}x")
print("OK" if rated_kgcm / kgcm >= 2 else "Choose a stronger motor or a higher gear ratio")
With these numbers the margin is only 1.6x, so the script warns you. Aim for at least twice the torque you calculate, because motors lose torque as the battery drains and real floors are never as kind as the formula. A higher gear ratio or a lighter build fixes it.
The controller and its software
The controller is the only component that "thinks", so it decides what the rest of the parts can do. A microcontroller such as an Arduino or ESP32 runs one program in a fast loop with precise timing, which suits motors and sensors.
A single-board computer such as a Raspberry Pi runs Linux, cameras and Python libraries, but its timing is less exact, so robots often pair the two: the Pi plans and the microcontroller drives.
The program itself is a component too. It has the same three parts as the hardware: reading sensors, deciding, and commanding actuators. The robotics programming languages guide explains which language runs on which part. Most of that logic is loops and conditions, which you can drill with short coding quizzes on Debugshala Test.
Common mistakes with robot components
- One supply for everything. Motors starting up pull the battery voltage down and reset the controller. Give logic its own regulator and add a large capacitor near the driver.
- Forgetting the common ground. Signals between boards only work when their grounds are joined.
- Mixing 5 V and 3.3 V parts. An ESP32 or Raspberry Pi pin can be damaged by a 5 V sensor output. Use a voltage divider or a level shifter.
- Choosing motors by speed alone. A fast motor with too little torque stalls on the first ramp. Check torque with a margin.
- No switch or fuse. You need a quick way to cut power when a robot misbehaves, and a fuse protects your wiring from a short.
Quick check
Your robot's Arduino resets every time the motors start. What is the most likely cause?
Motors draw a large current surge at start-up. If they share a supply with the logic, the voltage dips and the controller resets.
Key takeaways
- A robot has six subsystems: mechanics, actuators and drivers, sensors, controller, power and communication.
- Power paths and signal paths are different jobs; keep motor current away from logic supply.
- Every part speaks a signal type (digital, analog, PWM, pulse, UART, I2C, SPI) that decides its pin.
- Size the battery from a current budget, and size motors from a torque calculation with a 2x margin.
- Most early robot failures are power and wiring problems, so check those before you debug code.
FAQ
What are the 7 main components of a robot?
A common list of seven is: sensors, actuators, controller, power supply, mechanical structure, end effector (the tool or gripper), and communication. This article folds the end effector into the mechanical structure and adds drivers to the actuators, but the parts are the same.
Which component is the brain of a robot?
The controller is the brain. On small robots it is a microcontroller such as an Arduino or ESP32, and on robots that use cameras or ROS 2 it is often a single-board computer such as a Raspberry Pi working with a microcontroller.
Why does a robot need a motor driver?
A controller's pin can supply only a few tens of milliamps, while a motor needs hundreds of milliamps or more. A motor driver uses the controller's small signal to switch the large motor current and can also reverse the motor's direction.
What battery is best for a small robot?
A 2-cell Li-ion or LiPo pack at 7.4 V nominal is a common choice because it gives high current in a small size. Whatever you use, add a switch and a fuse.
Where can I learn robot electronics and wiring in Indore?
The Debugshala robotics programme in Indore covers electronics basics and safe wiring, motor drivers, sensors, Arduino and ESP32, and builds real robots at the Old Palasia campus. It accepts fresh graduates and non-IT learners, and you can join a free demo class before enrolling.
From the team behind this site
Go further with the Robotics Course at Debugshala
These tutorials are written by Debugshala, a training and placement institute at Old Palasia, Indore. The classroom course adds live mentoring, real projects and interview preparation.
- Offline classes at Old Palasia, Indore
- Free demo class before you pay
- Non-IT, fresher and year-gap friendly
- Placement assistance
700+ students placed · 200+ hiring partners · 4.9★ Google rating
