

Servo Motor with Arduino: SG90 Wiring, Code and Smooth Motion
Control a servo motor with Arduino: how pulse width sets the angle, SG90 wiring and power, Servo library code, smooth motion and torque checks for robot arms.
Think of the man who operates the railway level-crossing gate near Lakshmibai Nagar. When the station rings, he does not just push the boom "a bit". He lowers it until it is exactly horizontal, checking it with his eyes, and if a gust of wind pushes it up he pushes back until it is level again.
He has three things working together: muscles to move the boom, eyes to see where it is, and a target position in his head. If any one is missing, the gate ends up wherever it likes.
A servo motor packs exactly those three things into a plastic box the size of a matchbox.
What is a servo motor?
Map the gatekeeper onto the servo. His muscles are a small DC motor with a gearbox that slows it down and multiplies its strength. His eyes are a potentiometer fixed to the output shaft, whose voltage tells the circuit the current angle.
The target in his head is the control pulse you send from the Arduino. And the habit of pushing back when the wind moves the gate is a feedback loop on the servo's own circuit board.
A servo motor is a rotary actuator with a built-in position sensor and controller that turns its output shaft to a commanded angle and actively holds it there against load.
Because the feedback happens inside the servo, your Arduino does not need to measure anything. It only says "go to 90 degrees", and the servo does the rest.
That makes servos the easiest way to get precise angles for steering, grippers, robot arm joints and sensor turrets, such as a servo that sweeps an ultrasonic sensor with Arduino from side to side. The robot sensors and actuators overview compares servos with DC and stepper motors.
Inside a servo: a closed loop in a box
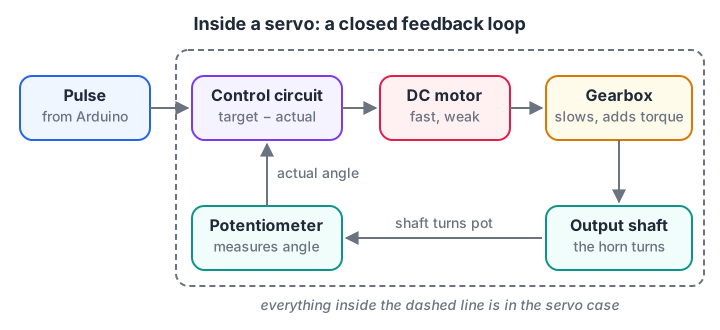
The servo's own circuit runs a feedback loop many times a second. Your code only supplies the target.
The control circuit subtracts the measured angle from the target angle. If the difference is large, it drives the motor hard; as the shaft gets close, it eases off. This is a proportional controller, the same idea explained in PID control explained, built into a chip.
Most hobby servos have a small deadband, a few microseconds of pulse width where they do not react. Without it the motor would twitch forever around the target. If you see a servo buzzing while holding still, it is usually fighting a load or noise near the edge of that deadband.
How the control pulse sets the servo angle
A hobby servo listens for one pulse every 20 milliseconds, which is 50 pulses per second. It ignores how often pulses arrive within reason and pays attention to how long each one lasts.
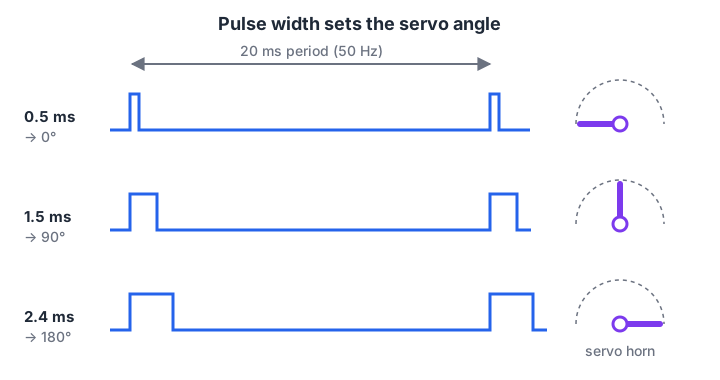
Same 20 ms period every time. Only the width of the HIGH pulse changes, and the width sets the angle.
The classic standard is 1.0 ms for one end, 1.5 ms for the centre and 2.0 ms for the other end. Many cheap servos such as the SG90 need a wider range, roughly 0.5 ms to 2.4 ms, to reach a full 180 degrees.
The Arduino Servo library assumes 544 to 2400 microseconds by default, which suits most hobby servos. You can turn the mapping into a small calculation:
def angle_to_us(angle, min_us=544, max_us=2400):
    angle = max(0, min(180, angle))
    return round(min_us + (max_us - min_us) * angle / 180)

def us_to_angle(us, min_us=544, max_us=2400):
    return (us - min_us) * 180 / (max_us - min_us)

print("Arduino Servo library defaults (544-2400 us):")
for a in (0, 45, 90, 135, 180):
    print(f"  write({a:3}) -> pulse {angle_to_us(a):4} us")

# After calibration you find your servo really spans 600-2350 us
print("\nThe same 1000 us pulse on different mappings:")
print(f"  default mapping: {us_to_angle(1000):.1f} degrees")
print(f"  calibrated:      {us_to_angle(1000, 600, 2350):.1f} degrees")
The difference looks small, but on a robot arm with a 15 cm link, 3 degrees of error moves the gripper almost 8 mm. Calibrating each servo's real end points is worth the ten minutes.
Quick check
What does the width of a servo control pulse set?
For a positional servo, the pulse width (about 0.5 to 2.4 ms on an SG90) sets the target angle. The pulse repeats every 20 ms.
Wiring a servo motor to Arduino
A hobby servo has three wires. On SG90-style servos they are usually brown (ground), red (power, 4.8 to 6 V) and orange (signal). Older servos may use black, red and white instead.
| Servo wire | Connect to | Notes |
|---|---|---|
| Brown or black | GND of the supply and Arduino GND | The shared ground is essential |
| Red | 5 V to 6 V supply | The Uno's 5 V pin can run one small SG90 lightly loaded, not several |
| Orange, yellow or white | Arduino pin 9 (any digital pin works with the library) | Signal only, a few milliamps |
A single SG90 can draw several hundred milliamps when it starts moving, and much more when stalled. Two or three servos on the Uno's 5 V pin will brown out the board, which looks like random resets.
Use a separate 5 V supply rated for at least 1 A per small servo, join its ground to the Arduino's ground, and put a 470 to 1000 µF capacitor across the servo supply near the servos.
Quick check
Your Uno resets whenever three servos move together. What should you fix first?
Servos pull large current surges. A separate supply stops the Arduino's voltage from dipping, and the shared ground keeps the signal valid.
Arduino servo code: from sweep to smooth motion
Sweep and hold
The Servo library comes with the Arduino IDE. attach() starts sending pulses on a pin; write() takes an angle.
#include <Servo.h>

Servo arm;

void setup() {
  arm.attach(9);           // default 544-2400 us; use arm.attach(9, 600, 2350) after calibrating
  arm.write(90);           // centre
  delay(1000);
}

void loop() {
  for (int a = 0; a <= 180; a += 1) { arm.write(a); delay(15); }
  for (int a = 180; a >= 0; a -= 1) { arm.write(a); delay(15); }
}
Control a servo with a potentiometer
Turning a knob to set an angle is the classic first project. map() converts the 0 to 1023 analog reading into 0 to 180 degrees.
#include <Servo.h>

Servo pan;
const int KNOB = A0;

void setup() { pan.attach(9); }

void loop() {
  int raw = analogRead(KNOB);              // 0-1023
  int angle = map(raw, 0, 1023, 0, 180);   // 0-180 degrees
  pan.write(angle);
  delay(20);                               // one update per servo frame
}
Smooth, non-blocking motion
write(150) tells the servo to get there as fast as it can, which jerks a robot arm and can tip over whatever it holds. Moving one degree at a time with millis() timing keeps motion smooth and leaves the loop free for sensors.
#include <Servo.h>

Servo joint;
int current = 90, target = 90;
unsigned long lastStep = 0;
const unsigned long STEP_MS = 12;      // ~83 degrees per second

void setup() { joint.attach(9); joint.write(current); Serial.begin(115200); }

void loop() {
  if (Serial.available()) target = constrain(Serial.parseInt(), 0, 180);

  if (current != target && millis() - lastStep >= STEP_MS) {
    current += (target > current) ? 1 : -1;
    joint.write(current);
    lastStep = millis();
  }
  // other work (sensors, buttons) runs here without waiting
}
Type an angle such as 150 in the Serial Monitor and the joint glides there. The runnable sketch below simulates the same idea and shows why gentle steps matter: the commanded position never jumps.
def glide(start, target, step_ms=12, frame_ms=60):
    pos, t, trace = start, 0, []
    while pos != target:
        pos += 1 if target > pos else -1
        t += step_ms
        if t % frame_ms == 0:              # sample every 60 ms for printing
            trace.append((t, pos))
    if trace[-1] != (t, pos):
        trace.append((t, pos))
    return trace

for t, pos in glide(90, 150):
    bar = "#" * ((pos - 80) // 2)
    print(f"{t:4} ms  {pos:3} deg  {bar}")
print("A plain write(150) would ask for the whole 60 degree jump in one frame.")
Choosing a servo: torque and speed
Servo torque is usually given in kg·cm: a servo rated 1.8 kg·cm can hold 1.8 kg on a 1 cm arm, or 0.18 kg on a 10 cm arm. A robot arm's shoulder holds everything beyond it, so check torque before you build.
| Servo | Gears | Approximate torque | Typical use |
|---|---|---|---|
| SG90 | Plastic | about 1.8 kg·cm at 4.8 V | Sensor pan, small grippers, light flaps |
| MG90S | Metal | about 2 kg·cm | Small arms, where plastic gears strip |
| MG996R | Metal | about 9 to 11 kg·cm | Arm shoulders, steering on bigger robots |
These are typical datasheet figures; check the one for the servo you buy.
# Shoulder servo holding an arm out horizontally (worst case)
link_cm = 12          # shoulder to elbow
link_g = 40           # weight of that link, acts at its middle
forearm_cm = 10
forearm_g = 30
payload_g = 50        # gripper plus the object, at the very end

torque_kgcm = (link_g * link_cm / 2
               + forearm_g * (link_cm + forearm_cm / 2)
               + payload_g * (link_cm + forearm_cm)) / 1000

for name, rated in (("SG90", 1.8), ("MG90S", 2.0), ("MG996R", 9.4)):
    margin = rated / torque_kgcm
    verdict = "ok" if margin >= 2 else "too weak"
    print(f"{name:7} rated {rated:4.1f} kg·cm  needs {torque_kgcm:.2f}  margin {margin:4.1f}x  {verdict}")
The shoulder needs about 1.85 kg·cm, so an SG90 or MG90S would sit at its limit and buzz, overheat or strip its gears. That is why robot arms use a strong servo at the shoulder and small ones at the wrist and gripper, an idea you will use in the robotic arm project.
Common servo motor mistakes
- Powering servos from the Arduino 5 V pin. It works for one idle SG90 and fails under load. Use a separate supply with a common ground.
- Using the Servo library and
analogWrite()on pins 9 or 10. On an Uno, the Servo library takes over Timer1, which disables PWM on pins 9 and 10. - Forcing the horn by hand. Turning a powered or unpowered servo by force strips plastic gears.
- Driving past the end stops. Pulses outside a servo's real range make it grind against its internal stop and draw stall current. Calibrate the limits.
- Expecting a continuous servo to hold angles. A "360 degree" continuous rotation servo has no position feedback:
write(90)stops it, and lower or higher values set speed and direction.
Key takeaways
- A servo has a motor, gearbox, potentiometer and controller inside, forming its own feedback loop.
- One pulse every 20 ms; pulse width sets the angle (Arduino default mapping 544 to 2400 µs).
- Use
attach(),write()andwriteMicroseconds()from the Servo library, and calibrate end points. - Separate servo power, common ground and a large capacitor prevent resets and jitter.
- Check torque in kg·cm with a 2x margin, and move in small steps for smooth motion.
FAQ
How many servo motors can an Arduino Uno control?
The Servo library supports up to 12 servos on an Uno and up to 48 on a Mega. Power is the real limit: each servo needs supply current from a separate 5 V source, not from the Uno. For many servos, a PCA9685 16-channel PWM board over I2C is a common choice.
Why is my servo motor jittering or buzzing?
Jitter usually comes from a weak or noisy power supply, a missing common ground, or a load near the servo's torque limit. Use a separate supply with a large capacitor, join the grounds, keep signal wires short, and stop sending new commands once the servo reaches its target.
What is the difference between a servo motor and a stepper motor?
A servo holds a commanded angle using an internal position sensor, typically over 180 degrees. A stepper motor moves in fixed steps without feedback and can rotate continuously, so it suits precise positioning over many turns, as in 3D printers. See stepper motors and drivers.
Can I control a servo with an ESP32?
Yes. Install the ESP32Servo library, which mirrors Arduino's Servo API with attach() and write(). Power the servo from 5 V, not the ESP32's 3.3 V pin; most servos accept a 3.3 V signal on the control wire, but test yours.
Where can I learn servo and motor control in Indore?
Debugshala's Old Palasia robotics lab classes cover DC motors, servos and motor drivers with Arduino and ESP32, and use them in project robots. The course accepts non-IT learners, runs in English and Hindi, and offers a free demo class. To check the underlying maths, solve quick quizzes on Debugshala Test.
From the team behind this site
Go further with the Robotics Course at Debugshala
These tutorials are written by Debugshala, a training and placement institute at Old Palasia, Indore. The classroom course adds live mentoring, real projects and interview preparation.
- Offline classes at Old Palasia, Indore
- Free demo class before you pay
- Non-IT, fresher and year-gap friendly
- Placement assistance
700+ students placed · 200+ hiring partners · 4.9★ Google rating
