

Ultrasonic Sensor with Arduino: HC-SR04 Wiring and Code
Wire an HC-SR04 ultrasonic sensor to Arduino or ESP32, read distance with pulseIn, and improve accuracy with temperature correction and a median filter.
Stand at the top of an old stepwell and clap your hands once. A moment later the clap comes back from the water far below. If the echo returns quickly, the water is high; if it takes longer, the water is low. You have just measured a depth with nothing but sound and a sense of time.
Time that echo to a millionth of a second, know how fast sound travels, and you get the depth to the nearest centimetre.
That is exactly what an ultrasonic sensor does, many times a second, using a pitch too high for you to hear.
How does an ultrasonic sensor work?
Map the stepwell onto the sensor. Your clap is a short burst of 40 kHz sound from the sensor's transmitter, one of its two round "eyes". The water is whatever object is in front of it. Your ears are the receiver, the second eye. Your sense of time is the Arduino measuring how long the echo pin stays HIGH.
An ultrasonic sensor is a distance sensor that sends a pulse of high-frequency sound, times the echo that bounces back from an object, and converts that round-trip time into distance using the speed of sound.
The HC-SR04 is the most common hobby module. It runs on 5 V, draws about 15 mA, measures from roughly 2 cm to 400 cm, and listens in a cone of about 15 degrees. The robot sensors and actuators overview compares it with IR, IMU and encoder sensors; this tutorial goes deep on the ultrasonic sensor alone.
HC-SR04 timing: trigger, burst and echo
The sensor has four pins: VCC, TRIG, ECHO and GND. A measurement always follows the same sequence.
- The Arduino pulls TRIG HIGH for at least 10 microseconds, then LOW.
- The module sends eight cycles of 40 kHz sound (about 200 microseconds of sound).
- The module raises ECHO to HIGH as the burst leaves.
- ECHO drops back to LOW when the echo is heard, or after a timeout if nothing returns.
- The width of the ECHO pulse is the round-trip time of the sound.
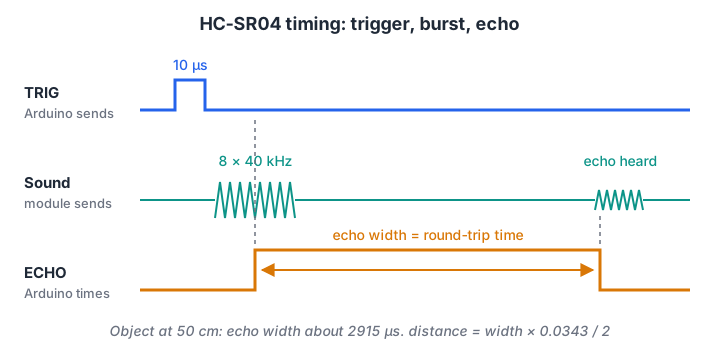
The Arduino only creates the short trigger and measures the echo width. The module handles the sound itself.
From echo time to distance
Sound travels about 343 metres per second in air at 20 °C, which is 0.0343 cm per microsecond. The pulse covers the distance twice, out and back, so:
distance_cm = echo_us × 0.0343 / 2
An object 50 cm away gives an echo pulse of about 2,915 microseconds. An object at the 400 cm limit gives about 23,300 microseconds, which is why a timeout of 25 to 30 milliseconds is enough.
Quick check
The ECHO pulse on an HC-SR04 is 1,166 microseconds wide at 20 °C. How far away is the object?
1166 × 0.0343 / 2 is about 20 cm. Divide by two because the sound travels out and back.
Wiring an ultrasonic sensor with Arduino and ESP32
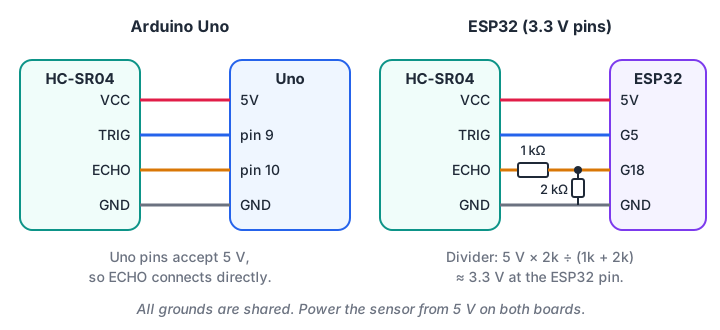
An Uno can read the 5 V echo directly. An ESP32 needs the divider, because its pins are not rated for 5 V.
| HC-SR04 pin | Arduino Uno | ESP32 |
|---|---|---|
| VCC | 5V | 5V (VIN or USB 5 V pin) |
| TRIG | Pin 9 | GPIO 5 (3.3 V is enough to trigger) |
| ECHO | Pin 10 | GPIO 18 through a 1 kΩ / 2 kΩ divider |
| GND | GND | GND |
The divider works like this: ECHO goes through a 1 kΩ resistor to the ESP32 pin, and a 2 kΩ resistor runs from that pin to ground. The pin then sees 5 × 2 ÷ 3, about 3.3 V. Some newer modules sold as 3.3 V-compatible do not need this, but check the listing and measure before you trust it.
Basic HC-SR04 Arduino code
This sketch prints the distance to the Serial Monitor four times a second. Open the monitor at 115200 baud.
const int TRIG = 9;
const int ECHO = 10;

void setup() {
  pinMode(TRIG, OUTPUT);
  pinMode(ECHO, INPUT);
  Serial.begin(115200);
}

float readCm() {
  digitalWrite(TRIG, LOW);
  delayMicroseconds(2);
  digitalWrite(TRIG, HIGH);
  delayMicroseconds(10);              // the 10 us trigger pulse
  digitalWrite(TRIG, LOW);
  unsigned long us = pulseIn(ECHO, HIGH, 25000UL);   // 25 ms timeout
  if (us == 0) return -1;             // no echo: out of range
  return us * 0.0343 / 2.0;
}

void loop() {
  float d = readCm();
  if (d < 0) Serial.println("out of range");
  else { Serial.print(d, 1); Serial.println(" cm"); }
  delay(250);
}
pulseIn() waits for ECHO to go HIGH, then times how long it stays HIGH. The third argument is a timeout in microseconds, so the sketch never hangs when nothing is in front of the sensor. A return value of 0 means "no echo", which this code reports instead of printing a false 0 cm.
Improving ultrasonic sensor accuracy
The basic sketch works, but in a real robot you will see jumps, dropouts and readings that drift with the weather. Three fixes cover most of it.
Correct the speed of sound for temperature
Sound travels faster in warm air. A good approximation is speed = 331.3 + 0.606 × T metres per second, where T is the air temperature in °C. Indore summers push room temperatures well above 20 °C, so the fixed 0.0343 figure starts to under-read.
def speed_of_sound(temp_c):
    return 331.3 + 0.606 * temp_c          # metres per second

true_cm = 100.0
for temp in (10, 20, 30, 40, 45):
    v = speed_of_sound(temp)
    echo_us = 2 * true_cm / (v * 100 / 1e6)    # real round-trip time
    naive = echo_us * 0.0343 / 2               # code that assumes 20 C
    fixed = echo_us * (v * 100 / 1e6) / 2      # temperature-corrected
    print(f"{temp:>3} C  speed {v:6.1f} m/s  echo {echo_us:7.1f} us  "
          f"naive {naive:6.1f} cm  corrected {fixed:6.1f} cm")
At 40 °C the uncorrected reading is about 3.5 cm short at one metre. That is harmless for an obstacle-avoiding robot, but it matters for a water-tank level gauge or a parking sensor. A cheap temperature sensor such as a DHT11 or DS18B20 is enough to correct it.
Filter out spikes with a median
Single readings sometimes jump: a soft cushion swallows the echo, the sound hits a wall at a steep angle and bounces away, or an echo from another sensor arrives. A median of five readings throws away the odd ones, where an average gets dragged by them.
import statistics

# 5-reading windows from a robot facing a wall 80 cm away
windows = [
    [80.2, 79.8, 80.5, 80.1, 79.9],      # clean
    [80.3, 80.0, 312.0, 79.7, 80.4],     # one stray long echo
    [79.9, 0.0, 80.2, 80.1, 0.0],        # two dropouts (no echo returned)
    [80.1, 15.3, 80.0, 79.8, 80.2],      # crosstalk from another sensor
]
for w in windows:
    valid = [d for d in w if 2 <= d <= 400]     # drop impossible values first
    print(f"raw {w}")
    print(f"   mean {statistics.mean(w):6.1f}   median of valid {statistics.median(valid):6.1f}\n")
The mean jumps to 126 cm, 48 cm and 67 cm, any of which would make a robot swerve or brake for nothing. The median stays near 80 cm every time. Throwing away values outside the sensor's 2 to 400 cm range before taking the median handles dropouts.
Give each ping time to die away
Sound keeps bouncing around a room after the echo you wanted. If you trigger again too soon, the next measurement can catch the tail of the previous one. Space pings about 60 ms apart, and when a robot has several ultrasonic sensors, fire them one after another rather than together.
Quick check
Why use the median instead of the mean of five readings?
The median picks the middle value, so a single spike or dropout is simply ignored.
Improved sketch: temperature compensation and median filter
const int TRIG = 9, ECHO = 10;
float airTempC = 30.0;                 // replace with a real temperature reading

float pingCm() {
  digitalWrite(TRIG, LOW);  delayMicroseconds(2);
  digitalWrite(TRIG, HIGH); delayMicroseconds(10);
  digitalWrite(TRIG, LOW);
  unsigned long us = pulseIn(ECHO, HIGH, 25000UL);
  if (us == 0) return -1;
  float cmPerUs = (331.3 + 0.606 * airTempC) / 10000.0;   // m/s to cm/us
  return us * cmPerUs / 2.0;
}

float medianCm(int n) {                // n up to 9
  float v[9]; int count = 0;
  for (int i = 0; i < n; i++) {
    float d = pingCm();
    if (d >= 2 && d <= 400) v[count++] = d;
    delay(60);                         // let echoes die away
  }
  if (count == 0) return -1;
  for (int i = 1; i < count; i++) {   // insertion sort, fine for 9 values
    float key = v[i]; int j = i - 1;
    while (j >= 0 && v[j] > key) { v[j + 1] = v[j]; j--; }
    v[j + 1] = key;
  }
  return v[count / 2];
}

void setup() { pinMode(TRIG, OUTPUT); pinMode(ECHO, INPUT); Serial.begin(115200); }

void loop() {
  float d = medianCm(5);
  Serial.println(d < 0 ? String("out of range") : String(d, 1) + " cm");
}
Five pings at 60 ms take about 0.3 seconds, fine for a level gauge. On a moving robot use three pings, or keep a rolling window and update it with one new ping per loop. The NewPing library from the Arduino Library Manager offers ready-made helpers such as ping_median() if you prefer not to write your own.
Where the sensor goes wrong
Knowing the physical limits saves hours of debugging.
- Angled surfaces. A wall hit at more than about 30 to 40 degrees reflects the sound away, and the sensor reports "far" or nothing.
- Soft materials. Curtains, sofas and clothes absorb ultrasound and weaken the echo.
- Thin or small objects. Chair legs and table edges may be missed because the cone is wide but the target is narrow.
- Very close objects. Under about 2 cm the echo returns before the module is ready to listen.
- The cone is wide. At 1 metre, a 15 degree cone is already about 26 cm across, so the reading may come from something beside the path, not directly ahead.
Key takeaways
- The HC-SR04 times a 40 kHz echo; distance is echo time × speed of sound ÷ 2.
- Use a 10 µs trigger pulse and a
pulseIn()timeout so the code never hangs. - Protect 3.3 V boards like the ESP32 with a voltage divider on ECHO.
- Correct for air temperature when accuracy matters, and filter with a median.
- Space pings about 60 ms apart, and fire multiple sensors in turn.
FAQ
What is the range of the HC-SR04 ultrasonic sensor?
The HC-SR04 typically measures from about 2 cm to 400 cm, with best results between 5 cm and 200 cm on flat, hard surfaces facing the sensor. Beyond that, the echo gets weak and readings become unreliable, especially from soft or angled objects.
Can I use an HC-SR04 with an ESP32 or Raspberry Pi?
Yes, but its ECHO pin outputs 5 V, which can damage 3.3 V pins. Use a voltage divider such as 1 kΩ and 2 kΩ on ECHO, and power the module from 5 V. A 3.3 V trigger signal from the ESP32 or Pi is usually enough.
Why does my ultrasonic sensor show 0 or random values?
A 0 usually means no echo returned before the timeout: the object is too far, too soft, angled away, or the wiring is loose. Random jumps come from echoes of earlier pings or other sensors. Check wiring, add a pulseIn timeout, space pings 60 ms apart and use a median filter.
How accurate is an ultrasonic distance sensor?
On a flat target facing the sensor, the HC-SR04 is usually accurate to a few millimetres to about a centimetre at short range. Temperature changes the speed of sound, adding roughly 0.17 percent error per degree away from your assumed temperature, so compensate when you need precision.
Where can I learn to use sensors like the HC-SR04 in Indore?
Debugshala's sensor-to-robot course in Indore covers distance, line, temperature and motion sensors with Arduino and ESP32, then uses them in obstacle-avoiding and line-follower robots at the Old Palasia campus. You can attend a free demo class first, and practise the maths with quizzes on Debugshala Test.
What should I build after reading the sensor?
Use the distance to make a robot react. The obstacle-avoiding robot project turns HC-SR04 readings into a stop, back up and turn routine, and a servo can sweep the sensor left and right, as shown in servo motors with Arduino.
From the team behind this site
Go further with the Robotics Course at Debugshala
These tutorials are written by Debugshala, a training and placement institute at Old Palasia, Indore. The classroom course adds live mentoring, real projects and interview preparation.
- Offline classes at Old Palasia, Indore
- Free demo class before you pay
- Non-IT, fresher and year-gap friendly
- Placement assistance
700+ students placed · 200+ hiring partners · 4.9★ Google rating
