

Stepper Motors and Drivers: A4988, ULN2003 and Arduino Code
Learn how stepper motors work, wire a 28BYJ-48 with ULN2003 or a NEMA 17 with A4988, set the current limit, use microstepping and add acceleration in code.
Look at the second hand of a cheap quartz wall clock. It does not glide; it jumps. Tick, one notch. Tick, another. Sixty ticks and it is back at the top. Nobody checks where the hand is, because if you know how many ticks have happened, you know exactly where it points.
Now hold the hand with your finger for a few seconds and let go. The clock keeps ticking from wherever the hand is, but it is now wrong, and nothing inside it knows.
Both halves of that story describe a stepper motor: exact positioning by counting, and a silent failure when something stops it.
What is a stepper motor?
Map the clock onto the motor. Each tick is a step, a fixed fraction of a turn. The clock mechanism that sends ticks is the stepper driver, which energises the motor's coils in a set order.
Counting ticks is how your Arduino knows the position, with no encoder. And holding the hand is a missed step: the load was too much, the motor slipped, and your step count no longer matches reality.
A stepper motor is a brushless DC motor that rotates in equal angular steps when its coils are energised in sequence, allowing precise open-loop positioning by counting the steps sent to it.
That is why 3D printers, CNC routers and camera sliders use steppers. Where a servo holds an angle within about 180 degrees, as covered in servo motors with Arduino, a stepper can turn any number of full revolutions and still land on an exact position.
How a stepper motor works
Inside, a toothed rotor with permanent magnets sits inside a ring of electromagnet coils grouped into two phases, A and B. Energising the phases in order pulls the rotor round one step at a time.
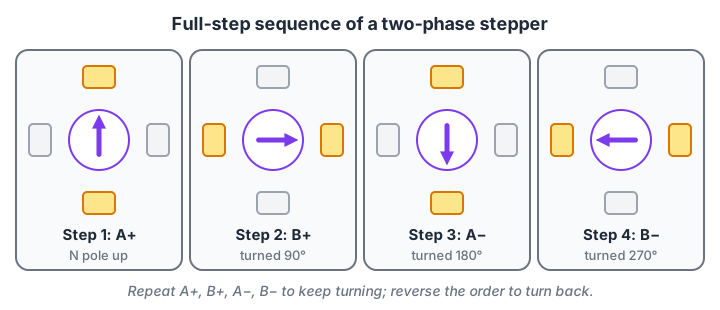
A simplified two-phase motor. Real hybrid steppers have many rotor teeth, so each of these four states moves the shaft only 1.8 degrees, not 90.
Reverse the sequence to reverse direction; step faster to turn faster. Stop stepping and the energised coil holds the rotor in place, which is called holding torque.
Types of stepper motors
| Type | How the rotor works | Where you meet it |
|---|---|---|
| Permanent magnet | Magnetised rotor, larger steps | Cheap small motors, often geared, such as the 28BYJ-48 |
| Variable reluctance | Plain iron rotor pulled to the nearest coil | Older industrial uses, rare in hobby work |
| Hybrid | Magnet plus fine teeth, small steps | NEMA 17 and NEMA 23 motors in printers and CNC machines |
Unipolar vs bipolar
A unipolar motor has a centre tap on each coil (usually 5 or 6 wires), so the driver only switches current one way through each half. It is simple to drive but wastes half of each coil.
A bipolar motor has 4 wires and needs an H-bridge per coil to reverse the current, which gives more torque for its size. The 28BYJ-48 is unipolar; nearly all NEMA 17 motors are bipolar.
Common stepper motors and their drivers
| Motor | Steps per output turn | Supply | Typical driver | Good for |
|---|---|---|---|---|
| 28BYJ-48 (geared, unipolar) | About 2048 in full-step mode (gear ratio about 1:64) | 5 V | ULN2003 board | Slow, light jobs: dials, small turntables, vents |
| NEMA 17 (hybrid, bipolar) | 200 (1.8 degrees each) | 12 V to 24 V into the driver | A4988, DRV8825, TMC2209 | 3D printers, sliders, small CNC |
The NEMA number is only the faceplate size (1.7 inches square for NEMA 17), so read the datasheet for torque and current.
Wiring a stepper driver with STEP and DIR
Drivers such as the A4988 hide the coil sequence completely. Your Arduino sends just two signals: a pulse on STEP for every step, and HIGH or LOW on DIR for direction. Like the motor drivers in components of a robot, it lets weak logic pins control strong currents.
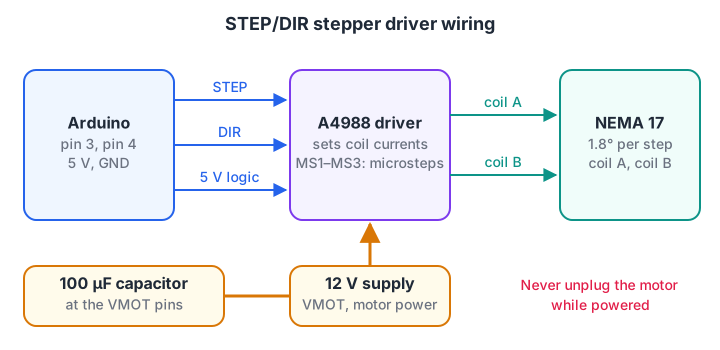
Logic and motor power are separate. The capacitor across the motor supply absorbs voltage spikes that can destroy the driver.
- Connect the driver's VDD and GND to the Arduino's 5 V and GND.
- Connect VMOT and GND to the motor supply (for example 12 V), with a 100 µF capacitor right at the driver's pins.
- Wire STEP to pin 3 and DIR to pin 4. On an A4988 breakout, tie RESET to SLEEP so the driver stays awake.
- Connect the motor's coil pairs to 1A/1B and 2A/2B. Find the pairs with a multimeter: two wires of the same coil show a few ohms between them.
- Set the current limit (below) before you run the motor under load.
- Never connect or disconnect the motor while the driver is powered. The voltage spike can kill the driver instantly.
Setting the current limit
A stepper driver controls current, not voltage, so it can run a 2.8 V motor from a 12 V supply safely. You set the maximum current with a small potentiometer on the board by measuring a reference voltage, VREF.
For the A4988 the relationship is I_max = VREF / (8 × R_sense), where R_sense is the current-sense resistor on your particular board (0.05, 0.068 and 0.1 ohm are common). Other drivers use other formulas, so check your board's documentation.
def a4988_vref(target_amps, r_sense):
    return target_amps * 8 * r_sense

motor_rated = 1.5              # amps per phase, from the motor datasheet
target = 0.7 * motor_rated     # run a bit below rating to keep things cool
for r in (0.05, 0.068, 0.1):
    print(f"R_sense {r:5.3f} ohm  ->  set VREF to {a4988_vref(target, r):.2f} V for {target:.2f} A")
print("The same VREF means a different current on a different board, so check R_sense first.")
Microstepping: smoother, quieter steps
Instead of switching each coil fully on or off, a driver can set intermediate currents in both coils, parking the rotor between full steps. This is microstepping. The A4988 supports full, 1/2, 1/4, 1/8 and 1/16 steps, chosen with its MS1, MS2 and MS3 pins; the DRV8825 goes to 1/32 and many TMC drivers go further with interpolation.
Microstepping makes motion smoother and quieter at low speed. It does not add precision in proportion, because a 1/16 microstep is held less firmly than a full step.
The most useful number in any stepper project is steps per millimetre, which converts a distance you want into steps you send.
full_steps = 200            # NEMA 17, 1.8 degrees per step
micro = 16                  # A4988 at 1/16 microstepping
steps_per_rev = full_steps * micro

belt_mm_per_rev = 20 * 2    # GT2 belt (2 mm pitch) on a 20-tooth pulley
screw_mm_per_rev = 8        # T8 lead screw, 8 mm lead

for name, mm in (("GT2 belt, 20T pulley", belt_mm_per_rev), ("T8 lead screw", screw_mm_per_rev)):
    spm = steps_per_rev / mm
    print(f"{name:<22} {spm:6.1f} steps/mm   smallest move {1000 / spm:5.1f} microns")

move_mm = 125
print(f"\nMove the belt axis {move_mm} mm: send {round(move_mm * steps_per_rev / belt_mm_per_rev)} steps")
The lead screw gives five times finer movement than the belt but is five times slower at the same step rate. That is why printers use belts for fast axes and screws for slow ones.
Quick check
A NEMA 17 motor (200 steps per revolution) runs on an A4988 at 1/8 microstepping. How many STEP pulses make one revolution?
200 full steps × 8 microsteps each = 1600 pulses per revolution.
Arduino code for stepper motors
28BYJ-48 with the built-in Stepper library
#include <Stepper.h>

const int STEPS_PER_REV = 2048;          // 28BYJ-48 output shaft, full-step
// ULN2003 IN1..IN4 on pins 8..11, passed in the order IN1, IN3, IN2, IN4
Stepper motor(STEPS_PER_REV, 8, 10, 9, 11);

void setup() {
  motor.setSpeed(10);                    // rpm; this motor tops out around 15
}

void loop() {
  motor.step(STEPS_PER_REV);             // one full turn clockwise
  delay(500);
  motor.step(-STEPS_PER_REV / 4);        // a quarter turn back
  delay(500);
}
The odd pin order is a well-known quirk: the library's coil sequence only matches this motor's wiring when the middle two pins are swapped.
NEMA 17 with an A4988 and acceleration
You can toggle STEP yourself, but starting at full speed makes a stepper stall, because the rotor cannot catch up with a sudden fast sequence. The AccelStepper library (from the Library Manager) ramps speed up and down for you.
#include <AccelStepper.h>

const int STEP_PIN = 3, DIR_PIN = 4;
AccelStepper axis(AccelStepper::DRIVER, STEP_PIN, DIR_PIN);

void setup() {
  axis.setMaxSpeed(3200);         // steps per second (1 rev/s at 1/16)
  axis.setAcceleration(4000);     // steps per second squared
  axis.moveTo(16000);             // 5 revolutions
}

void loop() {
  if (axis.distanceToGo() == 0) axis.moveTo(-axis.currentPosition());  // go back and forth
  axis.run();                     // call as often as possible; never use delay() here
}
run() sends at most one step per call when one is due, so the loop must stay fast.
Why acceleration matters, in numbers
This runnable block plans a trapezoidal move, the same shape AccelStepper uses: speed up, cruise, slow down.
import math

def plan(steps, vmax, accel):
    ramp = vmax**2 / (2 * accel)                 # steps needed to reach vmax
    if 2 * ramp >= steps:                        # too short: triangle profile
        peak = math.sqrt(steps * accel)
        return peak, 2 * peak / accel
    cruise = steps - 2 * ramp
    return vmax, 2 * vmax / accel + cruise / vmax

for steps in (800, 3200, 16000):
    peak, t = plan(steps, vmax=3200, accel=4000)
    print(f"{steps:6} steps: peak {peak:6.0f} steps/s, takes {t:5.2f} s")
Short moves never reach full speed, which is normal. The ramp costs a fraction of a second and saves you from missed steps.
Quick check
Your stepper buzzes and does not turn when you start it at high speed, but works at low speed. What is the best fix?
The rotor cannot follow a sudden fast step sequence. Ramping the speed up lets it keep up.
Common stepper motor mistakes
- Skipping the current limit. Too low and the motor is weak; too high and the driver overheats and shuts down. Set VREF first.
- No acceleration. Jumping straight to high speed stalls the motor. Ramp up and down.
- Wrong coil pairs. A motor that only vibrates usually has its coil wires mixed up between the two phases.
- Assuming position is always right. Steppers do not know when they skip. Machines home against a limit switch at start-up, and critical ones add an encoder, covered in wheel encoders and odometry.
- Leaving it energised. Holding current heats the motor even when still. Use the driver's ENABLE pin to release it when holding is not needed.
Key takeaways
- A stepper moves in equal steps; counting steps gives position without a sensor.
- Use a ULN2003 for the unipolar 28BYJ-48 and a STEP/DIR driver for bipolar NEMA 17 motors.
- Set the driver's current limit from VREF before running, and never unplug a powered motor.
- Microstepping smooths motion; steps per mm turns distances into step counts.
- Acceleration ramps and homing switches protect you from silent missed steps.
FAQ
What is the difference between A4988 and DRV8825?
Both are STEP/DIR bipolar stepper drivers on similar breakout boards. The DRV8825 handles somewhat more current and supply voltage and offers up to 1/32 microstepping, while the A4988 goes to 1/16. Their current-limit formulas differ, so set each from its own documentation.
Can I run a stepper motor directly from an Arduino?
No. Arduino pins supply only a few tens of milliamps, and stepper coils need hundreds of milliamps or more, with reversing current for bipolar motors. Always use a driver such as a ULN2003 or A4988 and a separate motor supply sharing ground with the Arduino.
Why does my stepper motor get hot?
Stepper motors draw current even when holding still, so a warm case is normal. If it is too hot to touch for a second, lower the driver's current limit or disable the driver when the motor does not need to hold position.
Stepper motor or servo motor for a robot?
Use a servo for a joint that moves within about 180 degrees and must hold an angle, like a gripper. Use a stepper for repeated precise positioning over many turns, like a linear axis or turntable. Wheeled robots usually use DC gear motors with encoders and PID control instead.
Where can I learn motor drivers and stepper control in Indore?
Project-based robotics lessons from Debugshala in Indore cover DC motors, servos and motor drivers with Arduino and ESP32, plus safe wiring at the Old Palasia campus. You can attend a free demo class before joining, and test your calculations with coding MCQs on Debugshala Test.
From the team behind this site
Go further with the Robotics Course at Debugshala
These tutorials are written by Debugshala, a training and placement institute at Old Palasia, Indore. The classroom course adds live mentoring, real projects and interview preparation.
- Offline classes at Old Palasia, Indore
- Free demo class before you pay
- Non-IT, fresher and year-gap friendly
- Placement assistance
700+ students placed · 200+ hiring partners · 4.9★ Google rating
