

Edge AI Explained: TinyML, Quantisation and Robotics Careers
Edge AI explained: TinyML, cloud vs edge, devices, pruning, distillation and int8 quantisation with numpy, LiteRT and ONNX code, and a career roadmap.
Imagine a security guard at a housing society gate in Vijay Nagar. For every vehicle, he could photograph the number plate, send it on WhatsApp to the society office across town, and wait for a reply. On a good day that takes a minute. When the network drops, the gate stays shut.
Or the society could give him a printed list of residents' vehicles. He checks the plate himself and opens the gate in seconds, and the photos never leave the gate.
The first guard is cloud AI. The second is edge AI. For a robot that must react in a fraction of a second, the second approach is often the only one that works.
What is edge AI?
Map the gate onto a robot. The guard is the robot's onboard computer. The office across town is a cloud server running a large model. The WhatsApp round trip is network latency, and the printed list is a small model stored on the device. The photos staying at the gate is data privacy.
Edge AI is the practice of running machine learning inference directly on a local device, close to where data is produced, rather than on a remote server, so decisions are made with low latency, without a constant network connection and without sending raw data away.
TinyML is edge AI on microcontrollers: models of tens or hundreds of kilobytes running on boards like the ESP32 or Arm Cortex-M chips, often on battery power. Typical jobs are wake-word detection, gesture recognition from an accelerometer, or spotting unusual motor vibration.
Training still happens on powerful computers. Edge AI is about inference: using a trained model to make predictions.
Cloud AI vs edge AI
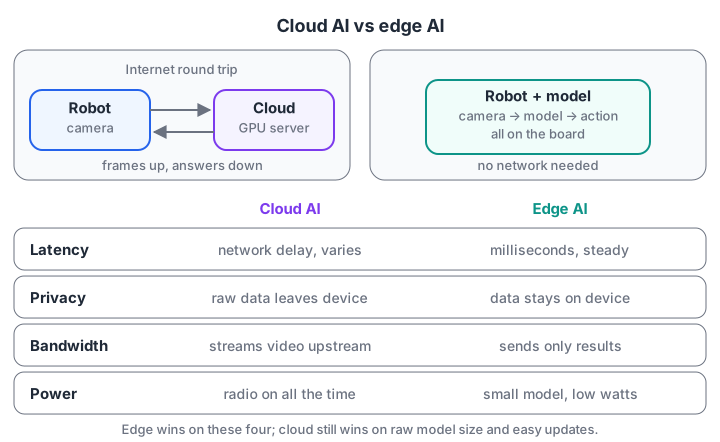
Edge AI keeps the loop on the robot; cloud AI adds a network round trip to every decision.
Latency. A robot moving at 1 metre per second travels 10 cm in 100 ms. If every decision waits for an internet round trip of varying delay, the robot reacts late and unpredictably.
Privacy. A home or hospital robot with a camera sees people and private spaces. With edge AI, raw images can stay on the device and only results ("person detected at 2 m") leave it.
Bandwidth. Streaming video from a fleet of robots uses a lot of data; sending results uses almost none.
Power and reliability. Radios cost energy, and networks drop out in basements, farms and factories.
The cloud still suits very large models, fleet-wide analytics and retraining. Many real systems are hybrid: fast decisions on board, hard cases and summaries to the cloud.
Quick check
A delivery robot must stop within 50 ms when a child steps in front of it. Where should the person detector run?
A network round trip adds variable delay and can drop out, so safety-critical detection runs on the device.
Edge AI devices, from tiny to powerful
| Device class | Typical examples | Memory | Good for |
|---|---|---|---|
| Microcontrollers | ESP32 (especially the S3 variant), Arm Cortex-M boards | Kilobytes to a few megabytes | Wake words, gesture and vibration classification, simple sensor models |
| Single-board computers | Raspberry Pi | Gigabytes | Small image classifiers and detectors on the CPU, at modest frame rates |
| Boards with an NPU | Add-on AI accelerators and boards with a built-in neural processing unit | Gigabytes plus dedicated accelerator | Real-time object detection at higher frame rates, low power per inference |
| Small GPU boards | Compact boards with an embedded GPU (NVIDIA's Jetson family is the best-known) | Several gigabytes, shared with the GPU | Multiple camera streams, larger vision models, robots running ROS 2 and AI together |
An NPU (neural processing unit) is a chip block built for the multiply-and-add maths of neural networks, usually in 8-bit integers. That is one big reason quantisation matters: many accelerators run only quantised models, or run them much faster.
The model optimisation pipeline
A model trained on a workstation is usually stored as 32-bit floating-point numbers (FP32) and can be far too big or slow for a robot. Engineers shrink it in stages.
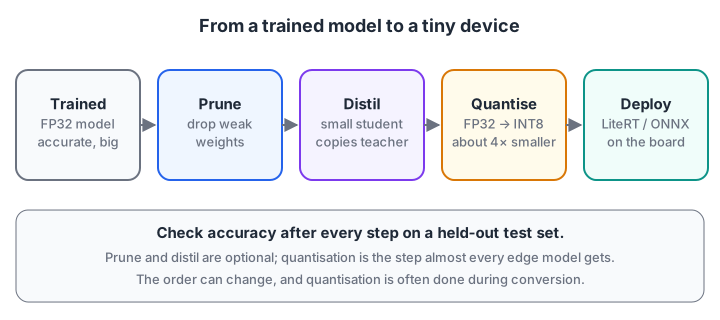
Each step trades a little accuracy for a smaller, faster model, so measure accuracy after every step.
Pruning removes weights or whole channels that contribute little, then fine-tunes the model so the rest compensate. Knowledge distillation trains a small "student" model to imitate a large "teacher" model's outputs, which often works better than training the small model from scratch.
Quantisation stores weights (and often activations) as 8-bit integers instead of 32-bit floats, cutting size by about 4× and enabling fast integer hardware. Finally the model is converted to a runtime format such as LiteRT (.tflite) or ONNX (.onnx) and deployed.
Quantisation can be done after training (post-training quantisation, using a small calibration dataset) or simulated during training (quantisation-aware training), which usually keeps more accuracy for sensitive models.
Int8 quantisation demo in numpy
Here is the core of int8 quantisation on a fake neural network layer. Each float is divided by a scale, rounded to an integer between −127 and 127, and stored as one byte. To use it, you multiply back by the scale. The demo uses type conversion between float32 and int8 arrays.
import numpy as np
rng = np.random.default_rng(0)

# A fake layer: 256 x 512 weights, roughly the shape of a small dense layer
w = rng.normal(0, 0.05, size=(256, 512)).astype(np.float32)

# Symmetric per-tensor int8 quantisation
scale = np.abs(w).max() / 127
q = np.clip(np.round(w / scale), -127, 127).astype(np.int8)
w_back = q.astype(np.float32) * scale            # dequantise to compare

err = np.abs(w - w_back)
print(f"float32 size : {w.nbytes / 1024:7.1f} KB")
print(f"int8 size    : {q.nbytes / 1024:7.1f} KB  (+4 bytes for the scale)")
print(f"compression  : {w.nbytes / q.nbytes:.0f}x smaller")
print(f"scale        : {scale:.6f}")
print(f"mean abs err : {err.mean():.6f}   max abs err: {err.max():.6f}")

# Does the layer still compute the same thing?
x = rng.normal(0, 1, size=(1, 256)).astype(np.float32)
y_fp32, y_int8 = x @ w, x @ w_back
rel = np.linalg.norm(y_fp32 - y_int8) / np.linalg.norm(y_fp32)
print(f"output relative error: {rel:.3%}")
print("first 4 outputs fp32:", np.round(y_fp32[0, :4], 4))
print("first 4 outputs int8:", np.round(y_int8[0, :4], 4))
The layer shrinks from 512 KB to 128 KB, and the output changes by only about 1%. The maximum error per weight is half the scale, as you would expect from rounding.
One large outlier weight can ruin this, because it stretches the scale for everything else. Real toolchains therefore use a separate scale per output channel. The next demo shows the difference, and also why pruning needs fine-tuning afterwards.
import numpy as np
rng = np.random.default_rng(1)

w = rng.normal(0, 0.05, size=(256, 512)).astype(np.float32)
w[0, 0] = 2.0                                    # one outlier weight

def int8_error(w, scale):
    q = np.clip(np.round(w / scale), -127, 127)
    return np.abs(w - q * scale).mean()

per_tensor = np.abs(w).max() / 127
per_column = np.abs(w).max(axis=0) / 127         # one scale per output channel
print(f"per-tensor scale   : mean error {int8_error(w, per_tensor):.6f}")
print(f"per-channel scales : mean error {int8_error(w, per_column):.6f}")

# Pruning: zero the 50% smallest weights and see how much the output moves
x = rng.normal(0, 1, size=(1, 256)).astype(np.float32)
cut = np.quantile(np.abs(w), 0.5)
w_pruned = np.where(np.abs(w) < cut, 0, w)
rel = np.linalg.norm(x @ w - x @ w_pruned) / np.linalg.norm(x @ w)
print(f"pruned 50% of weights -> output relative error {rel:.1%}")
Per-channel scales cut the error by more than ten times here. Pruning half the weights blindly shifts the output by about a quarter, which is why pruned models are always fine-tuned before deployment.
Quick check
Why is int8 quantisation popular for edge AI?
Storing weights in 1 byte instead of 4 shrinks the model, and many edge accelerators are built for 8-bit integer maths.
Running a model on the device
Google's TensorFlow Lite has been renamed LiteRT, and its Python runtime ships in the ai-edge-litert package.
The classic Interpreter API below is still available for compatibility and is what most existing tutorials use; for new projects, the LiteRT docs recommend the newer CompiledModel API, which adds GPU and NPU acceleration. This example needs a real .tflite file, so it has no Run button.
import numpy as np
from ai_edge_litert.interpreter import Interpreter

interpreter = Interpreter(model_path="obstacle_classifier_int8.tflite")
interpreter.allocate_tensors()
inp = interpreter.get_input_details()[0]
out = interpreter.get_output_details()[0]

frame = np.random.rand(*inp["shape"]).astype(np.float32)   # replace with a camera frame

if inp["dtype"] == np.int8:                  # fully quantised model: quantise the input
    scale, zero_point = inp["quantization"]
    frame = np.round(frame / scale + zero_point).astype(np.int8)

interpreter.set_tensor(inp["index"], frame)
interpreter.invoke()
scores = interpreter.get_tensor(out["index"])
print("class scores:", scores)
ONNX Runtime is the other common choice. PyTorch and many other frameworks export to ONNX, and execution providers let the runtime use accelerators where supported.
import numpy as np
import onnxruntime as ort

session = ort.InferenceSession("detector.onnx", providers=["CPUExecutionProvider"])
input_meta = session.get_inputs()[0]
print("expects", input_meta.name, input_meta.shape)

image = np.random.rand(1, 3, 224, 224).astype(np.float32)  # NCHW, replace with a real image
outputs = session.run(None, {input_meta.name: image})
print("output shape:", outputs[0].shape)
On a robot, this code sits inside the "think" step of the loop: a camera node captures a frame, the model runs, and the result is published for the planner, as in ROS 2 basics.
Common edge AI mistakes
- Measuring accuracy only before optimisation. Always re-test the final quantised model on real data from your robot's camera or sensors.
- Calibrating with unrealistic data. Post-training quantisation needs calibration samples that look like real inputs, including bad lighting.
- Ignoring pre-processing time. Resizing and normalising images on a slow CPU can take longer than the model itself.
Robotics and edge AI careers: a learning roadmap
Edge AI sits where robotics, embedded systems and machine learning meet. Common roles include embedded and firmware developer, robotics software engineer, ROS developer, computer vision engineer, edge ML or MLOps engineer, and IoT developer. Drones, warehouse automation, smart cameras, agritech and industrial inspection all need some mix of these skills.
A practical order to learn in:
- Python and basic programming. Variables, conditions, loops and functions, starting with getting started with Python.
- Electronics and microcontrollers. Safe wiring, digital and analog I/O, sensors and motors on Arduino and ESP32.
- Control and robot projects. Build a line follower and the obstacle-avoiding robot, then add PID control.
- Linux, Raspberry Pi and computer vision. Camera capture, OpenCV basics, simple detection.
- ROS 2. Nodes, topics and launch files, so your projects look like industry robot software.
- Machine learning and edge deployment. Train a small classifier, quantise it, and run it on a Pi or microcontroller with LiteRT or ONNX Runtime.
- A portfolio project. One robot that senses, decides with a model on board, and acts, documented with code and a short video.
Steps 1 to 5 are exactly the ground covered by Debugshala's Indore robotics training: a project-based course at the Old Palasia campus covering Python for robotics, electronics basics and safe wiring, Arduino and ESP32 (digital and analog I/O, Wi-Fi, Bluetooth), sensors, DC motors, servos and motor drivers, line-follower and obstacle-avoiding robots, Raspberry Pi with a camera for basic computer vision, ROS 2 basics, and a final robot project.
Steps 6 and 7 build on that base, and Debugshala's Machine Learning and Data Science & AI courses cover the model side. You can also take aptitude and coding quizzes on Debugshala Test to check your fundamentals as you go.
Key takeaways
- Edge AI runs inference on the device for low latency, privacy, low bandwidth and offline operation; TinyML does it on microcontrollers.
- Device choice ranges from microcontrollers to Raspberry Pi, NPU boards and small GPU boards.
- Optimise with pruning, distillation and quantisation, and re-check accuracy after each step.
- Int8 quantisation gives about 4× smaller weights; per-channel scales keep the error low.
- LiteRT and ONNX Runtime run optimised models with a few lines of Python.
FAQ
What is the difference between edge AI and TinyML?
Edge AI is the broad idea of running models on local devices, from phones and cameras to robot computers with GPUs. TinyML is the subset that targets microcontrollers with very little memory and power, such as wake-word or gesture models running on a coin-cell or small battery.
Can a Raspberry Pi run AI models?
Yes. A Raspberry Pi can run small, quantised image classifiers and detectors on its CPU at modest frame rates, which is enough for many hobby and learning robots. For faster detection, add an AI accelerator or move to a board with an NPU or GPU.
Do I need deep learning knowledge before learning edge AI?
You need the basics: what a model is, how training differs from inference, and how to measure accuracy. Most edge work starts from existing pre-trained models that you fine-tune, optimise and deploy.
Does the Debugshala Robotics course in Indore cover edge AI?
The course covers the foundations edge AI builds on: Python for robotics, Arduino and ESP32, sensors and motors, Raspberry Pi with a camera for basic computer vision, and ROS 2 basics, ending with a final robot project at the Old Palasia campus.
It accepts fresh graduates and non-IT learners, offers placement assistance, and you can book a free demo class by calling +91-8982385539 or emailing info@debugshala.com.
From the team behind this site
Go further with the Robotics Course at Debugshala
These tutorials are written by Debugshala, a training and placement institute at Old Palasia, Indore. The classroom course adds live mentoring, real projects and interview preparation.
- Offline classes at Old Palasia, Indore
- Free demo class before you pay
- Non-IT, fresher and year-gap friendly
- Placement assistance
700+ students placed · 200+ hiring partners · 4.9★ Google rating
