

Robotics Projects for Beginners: 12 Ideas from Easy to Advanced
Robotics projects for beginners: 12 ideas from a smart dustbin to a TinyML robot, with parts, skills, a power budget, a maze solver and portfolio tips.
Think about learning to drive. Nobody starts on the Bypass at rush hour. You start in an empty ground near Super Corridor, learning the clutch and brakes. Then quiet lanes. Then traffic, then the highway at night.
Each stage adds one new difficulty while the earlier ones become automatic. Skip a stage, and you stall in the middle of a busy junction.
Robotics projects work the same way.
What makes a good robotics project for beginners?
Map the driving lessons onto robotics. The empty ground is a one-sensor, one-motor build where little can go wrong. Quiet lanes are a mobile robot that reacts to its surroundings. City traffic is wireless control, cameras and software that many parts depend on. The highway is the integrated robot you show an employer.
A good beginner robotics project is a small, finishable build in which a robot senses something, makes a decision in code and acts on the world, chosen so that it adds one or two new skills to what you already know.
Three tests help you pick:
- Can you finish it in one to three weekends? Unfinished ambitious projects teach less than finished small ones.
- Does it close the loop? Sensing without acting, or acting without sensing, misses the core of robotics. The components of a robot guide breaks this sense-think-act loop down.
- Does it add exactly one hard thing? New board, new sensor or new algorithm: pick one per project.
The robotics project ladder
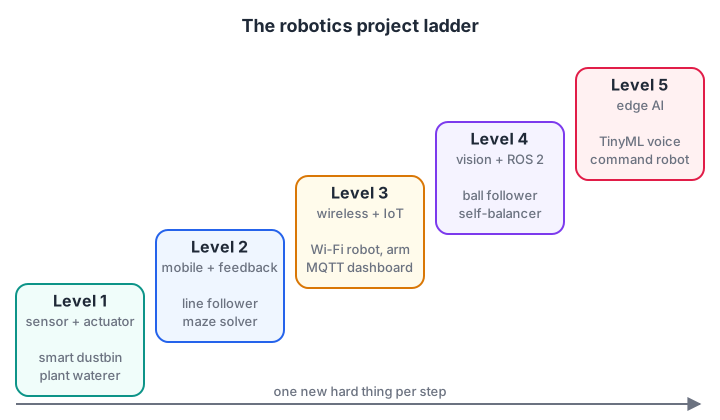
Each level reuses the skills of the one below it, so the jump never feels huge.
Here are 12 ideas, ordered by level. The linked ones have full build guides on this site.
| # | Project | Level | Main parts | What you learn |
|---|---|---|---|---|
| 1 | Smart dustbin with auto lid | 1 | Arduino Uno, HC-SR04, SG90 servo | Distance sensing, servo angles, timing without delay() traps |
| 2 | Automatic plant watering | 1 | Soil moisture probe, relay or MOSFET, small pump | Analog readings, thresholds, safe switching of loads |
| 3 | Obstacle-avoiding robot | 2 | 2WD chassis, motor driver, ultrasonic sensor | Motor control, simple decision rules |
| 4 | Line follower robot | 2 | IR sensor array, motor driver | Calibration, PD control, tuning |
| 5 | Maze-solving robot | 2 | Three distance sensors, encoders | Wall following, turning accurately, odometry |
| 6 | Bluetooth controlled robot | 3 | HC-05 or ESP32, phone app | Serial protocols, failsafe stops |
| 7 | ESP32 Wi-Fi robot | 3 | ESP32, TB6612FNG | Web server control, timeouts |
| 8 | Robot telemetry dashboard over MQTT | 3 | ESP32, broker on a laptop or Pi | Publish/subscribe, Last Will, dashboards |
| 9 | 4-DOF robotic arm | 3 | Servos, PCA9685 | Joint limits, inverse kinematics |
| 10 | Self-balancing robot | 4 | MPU-6050 IMU, steppers or geared DC motors | Sensor fusion, fast PID loops |
| 11 | Ball-following camera robot | 4 | Raspberry Pi, camera, OpenCV | Colour masks, steering from vision |
| 12 | Voice-command robot with TinyML | 5 | ESP32-S3 or Cortex-M board with a microphone | Data collection, tiny models, int8 deployment |
Levels 4 and 5 are where ROS 2 and AI enter. Once a robot works, rebuild its software as ROS 2 nodes (ROS 2 basics), and try the same robot in Gazebo simulation. Project 12 follows the workflow in TinyML explained.
Which projects suit which robotics career?
If you already know the role you want, weight your choices towards it:
- Embedded or firmware developer: projects 1, 2, 8 and 10, which stress timing, interrupts, power and fast control loops.
- Robotics software or ROS developer: projects 5, 9 and 11, rebuilt as ROS 2 nodes and tested in simulation.
- Computer vision engineer: project 11, then add object detection on the Pi.
- Edge AI or ML engineer: project 12, then a quantised camera model, following edge AI hardware.
- IoT developer: projects 2 and 8, with MQTT, dashboards and battery-powered nodes.
Quick check
Which project is the best next step after an obstacle-avoiding robot?
Add one new skill at a time; line following adds PD control, maze solving adds structured decisions.
Before you buy parts: do a power budget
Most beginner robots that "randomly reset" are short of power, not code. Before ordering parts, add up the current each part draws and how often it is on. This tells you how long the battery lasts and how big the 5 V regulator must be.
# Power budget for a beginner robot car (currents in mA, typical values; check datasheets)
parts = {
    "ESP32 dev board (Wi-Fi on)": (120, 1.0),     # (average mA, fraction of time on)
    "HC-SR04 ultrasonic sensor": (15, 1.0),
    "SG90 servo (scanning)": (250, 0.2),
    "2 x TT gear motors (driving)": (2 * 250, 0.6),
    "TB6612FNG driver logic": (2, 1.0),
}
battery_mah, usable = 2600, 0.8              # 2 x 18650 in series; don't drain flat
total = 0
for name, (ma, duty) in parts.items():
    avg = ma * duty
    total += avg
    print(f"{name:30s} {avg:6.0f} mA average")
print(f"{'total':30s} {total:6.0f} mA")
print(f"estimated runtime: {battery_mah * usable / total * 60:.0f} minutes")

logic_5v = 120 + 15 + 250 + 2                # worst case on the 5 V rail at one moment
print(f"5 V rail peak about {logic_5v} mA -> pick a buck converter rated 1 A or more")
The car runs for roughly four hours of mixed driving, and the 5 V rail needs a converter with plenty of headroom above its 387 mA peak. A servo stalling or motors starting can briefly draw several times their running current, which is why the motors should get their own supply from the battery, not the board's 5 V pin.
Quick check
Your robot resets every time the motors start. What is the most likely cause?
Motor start-up current causes voltage dips. Give motors their own supply or a stronger regulator, with a shared ground.
Project walk-through: a smart dustbin (level 1)
The smart dustbin is a perfect first build. An ultrasonic sensor watches for a hand, and a servo lifts the lid, then closes it a few seconds after the hand leaves. It teaches sensing, actuation and timing in about 30 lines.
- Wire the HC-SR04 to 5 V, GND, TRIG on pin 9 and ECHO on pin 10. Wire the SG90 signal to pin 6, and power the servo from a separate 5 V supply with a shared ground.
- Test the sensor alone by printing distances to the Serial Monitor, as in the ultrasonic sensor guide.
- Test the servo alone with a sweep, and note the angles that fully close and fully open your lid.
- Combine them with the sketch below, then tune the trigger distance and open time.
#include <Servo.h>

const int TRIG = 9, ECHO = 10, SERVO_PIN = 6;
const int CLOSED = 10, OPEN = 100;          // measure these on your own lid
const unsigned long OPEN_MS = 3000;
Servo lid;
unsigned long lastSeen = 0;
bool isOpen = false;

float readCm() {
  digitalWrite(TRIG, LOW); delayMicroseconds(2);
  digitalWrite(TRIG, HIGH); delayMicroseconds(10);
  digitalWrite(TRIG, LOW);
  unsigned long us = pulseIn(ECHO, HIGH, 30000);   // 30 ms timeout
  return us == 0 ? 999 : us * 0.0343 / 2;
}

void setup() {
  pinMode(TRIG, OUTPUT); pinMode(ECHO, INPUT);
  lid.attach(SERVO_PIN);
  lid.write(CLOSED);
}

void loop() {
  if (readCm() < 15) {                         // hand within 15 cm
    lastSeen = millis();
    if (!isOpen) { lid.write(OPEN); isOpen = true; }
  }
  if (isOpen && millis() - lastSeen > OPEN_MS) {
    lid.write(CLOSED); isOpen = false;
  }
  delay(60);                                   // let echoes die away
}
Extend it: add a second sensor inside the bin to report "bin full", then send that over Wi-Fi with an ESP32. That one change turns project 1 into a level 3 IoT project.
Project walk-through: a maze-solving robot (level 2)
A maze solver adds decision-making. The simplest strategy is the right-hand rule: keep a wall on your right, and you will reach the exit of any maze whose walls are all connected.
The robot needs only three distance sensors (left, front, right) and accurate 90° turns. Test the logic in simulation first; the for loop and if checks below are covered in the for loop tutorial.
maze = ["#########",
        "#S..#...#",
        "#.#.#.#.#",
        "#.#...#.#",
        "#.#####.#",
        "#...#..E#",
        "#########"]
grid = [list(r) for r in maze]
moves = [(-1, 0), (0, 1), (1, 0), (0, -1)]   # N, E, S, W (clockwise)
r, c, heading = 1, 1, 1                       # start at S, facing east
free = lambda r, c: grid[r][c] != "#"
steps = 0
while maze[r][c] != "E" and steps < 200:
    # Right-hand rule: try right, then straight, then left, then turn back
    for turn in (1, 0, -1, 2):
        h = (heading + turn) % 4
        dr, dc = moves[h]
        if free(r + dr, c + dc):
            heading, r, c = h, r + dr, c + dc
            break
    steps += 1
    if grid[r][c] == ".": grid[r][c] = "*"
print("\n".join("".join(row) for row in grid))
print(f"reached the exit in {steps} moves; * marks every cell visited")
The robot reaches the exit in 26 moves, including a wasted trip into the bottom-left dead end. The shortest route is only 14 moves. A stronger robot maps the maze on its first run and plans the shortest path on the second, using A* path planning and wheel encoders and odometry to know where it is.
How to finish every robotics project
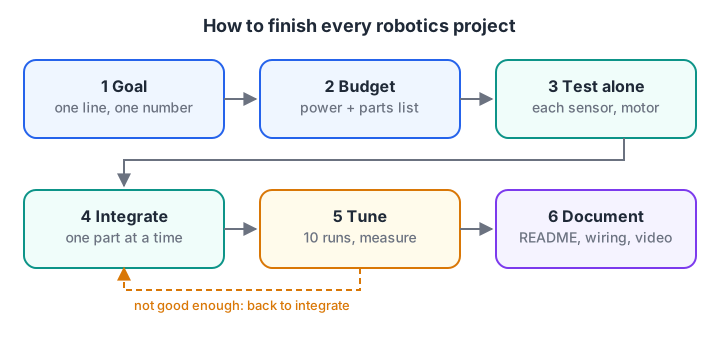
Testing each part alone before integrating saves more time than any other habit.
- Write a one-line goal with a number, such as "follow a black line at 0.3 m/s without leaving it on a 2 m loop".
- Budget power and list parts, as in the calculator above.
- Test every part alone: sensor prints values, motor spins both ways, servo reaches both limits.
- Integrate one part at a time, keeping a version that works.
- Tune and measure: lap time, success rate out of 10 runs, battery runtime.
- Document it while it is fresh.
Make it portfolio-ready
For each project, keep a short README with the goal, a parts list, a wiring diagram, the code, one photo and a 30-second video. Add a "what went wrong" section: the brown-out you fixed, the sensor you replaced.
In interviews, these stories are more convincing than a long list of project names, and they prepare you for the robotics interview questions you are likely to face.
Common beginner project mistakes
- Starting with a humanoid or drone. Many moving parts, many failure points; build level 1 and 2 robots first.
- Powering motors from the Arduino's 5 V pin. It causes resets and can damage the board.
- Wiring everything before testing anything. Test each part alone.
- Copying code without changing it. Change one thing, predict what happens, then check.
- No common ground. Separate supplies must share ground or signals become meaningless.
Key takeaways
- Good beginner projects are small, finishable and close the sense-think-act loop.
- Climb the ladder: single sensor, mobile robot, wireless and IoT, vision and ROS 2, then edge AI.
- Budget power before buying parts and give motors their own supply.
- Test each part alone, integrate step by step and measure results.
- Document every project with a README, wiring diagram, video and what went wrong.
FAQ
What is the easiest robotics project for a beginner?
A smart dustbin or an automatic plant waterer is the easiest place to start. Each uses one sensor, one actuator and a few lines of Arduino code, so you learn wiring, reading a sensor and driving a servo or pump without the complexity of a moving robot.
Which board should I use for my first robotics project?
An Arduino Uno or Nano is the gentlest start for level 1 and 2 projects. Move to an ESP32 when you need Wi-Fi or Bluetooth, and to a Raspberry Pi when you need a camera or Linux. The Arduino vs ESP32 vs Raspberry Pi guide compares them.
Can I do robotics projects without knowing coding?
You can wire a kit by following instructions, but you will not learn much. Basic programming, variables, conditions, loops and functions, is what lets you change a robot's behaviour. Start with getting started with Python and Arduino C++ basics alongside your first build.
How many projects should I have on my resume for a robotics job?
Three to five well-documented projects at different levels are more convincing than ten unfinished ones. Include at least one mobile robot with feedback control, one project with wireless or a camera, and ideally one using ROS 2 or a small AI model.
Where can I build robotics projects with guidance in Indore?
Debugshala's robotics course at the Old Palasia campus is project-based: you build line-follower and obstacle-avoiding robots, work with Arduino, ESP32, sensors, motors and a Raspberry Pi camera, learn ROS 2 basics and finish with a final robot project.
See robotics project classes for beginners at Debugshala. Fresh graduates and non-IT learners are welcome, and there is a free demo class. You can also practise aptitude and logic questions on Debugshala Test.
From the team behind this site
Go further with the Robotics Course at Debugshala
These tutorials are written by Debugshala, a training and placement institute at Old Palasia, Indore. The classroom course adds live mentoring, real projects and interview preparation.
- Offline classes at Old Palasia, Indore
- Free demo class before you pay
- Non-IT, fresher and year-gap friendly
- Placement assistance
700+ students placed · 200+ hiring partners · 4.9★ Google rating
